Lab 12: Introduction to pH, Household Products, and Buffers
|
|
pH is a term that is placed on a lot of product labels, but most people really don't know what it means. They usually figure it has something to do with how acidic something is, which is correct. "pH Balanced" is another term that is thrown about, but also poorly misunderstood.
|
Objectives |
1. Check the pH of aqueous solutions of household products using various pH indicators and a pH meter.
2. Identify a buffer solution.
3. Confirm carbonic acid forms from breath.
|
What does pH mean? |
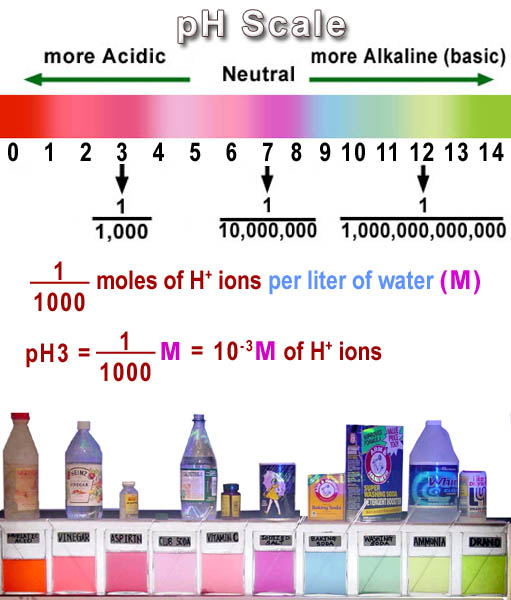 |
pH is a way to express the concentration of the hydrogen ions (H+) in a solution. In chemistry, one common way of expressing a concentration is grams of a substance per 100 mL of solution which is abbreviated as % w/v (percent weight per volume). It can also be giving as grams per 1 liter of solution. Instead of the concentration being based on weight, it can also be based on the number (the count) of the atoms or molecules. In chemistry we count with moles. Hydrogen ion concentration is usually shown as moles per liter (Molarity). M is the abbreviation for molarity, which means "moles per liter"). In pure water, some molecules of water split apart to form H+ and OH- ions making the concentration of H+ and OH- the same with both being 10-7 moles per liter. In other words, a liter of water only has 1 ten millionth of a mole of these ions in that liter. Vinegar has 10-3 moles of H+ per liter. That's one thousandth of a mole. Comparing one thousandth (10-3=1/1000) to one ten millionth (10-7=1/10,000,000) shows that the H+ concentration in vinegar is a 10,000 times higher than that of pure water. In alkaline solutions, the concentration of the H+ ion is much less than it is in pure water. That's because in alkaline solutions there are more OH- ions present, which when they bump into H+ ions, they combine to form water (H2O). For example, Liquid Plumber (a drain opener), has a high concentration of OH- ions which makes the H+ ions very scarce. There is only 1 trillionth (10-12=1/1,000,000,000,000) of a mole of H+ ions per liter in Liquid Plumber. As you can see it's rather cumbersome to write one trillionth as 10-12, 1/1,000,000,000,000 or even its decimal fraction of 0.000000000001. So a shorter way was devised. Notice one trillionth written as a power of ten is 10-12. If you took the exponent (-12) and took the negative of that, it would simply be 12. pH is that shortcut. It's the negative of the exponent of ten. So pH 3 really means 10-3 moles per liter of H+ ions. Remember this was the H+ concentration in vinegar. So that's why you may read vinegar has a pH of 3 meaning 10-3 moles per liter. |
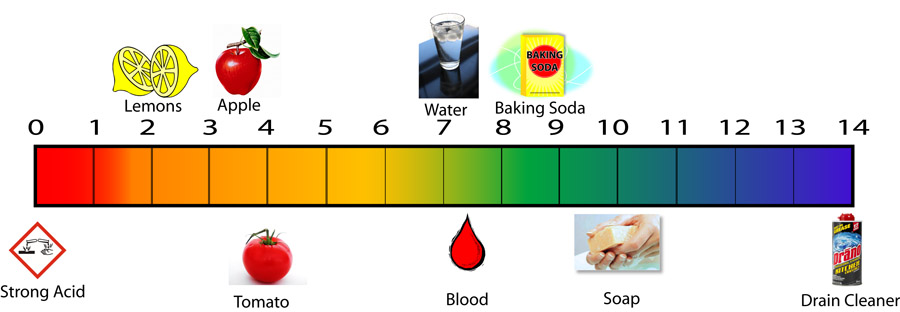
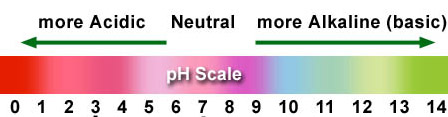
Going from a pH to H+ concentration is easy. Just make the pH number negative and make it the exponent of 10. The pH values in the image below will then turn into this list: 100, 10-1, 10-2, 10-3, 10-4, 10-5, 10-6, 10-7, 10-8, 10-9, 10-10, 10-11, 10-12, 10-13, 10-14 moles per liter.
Note 100 = 1 mole per liter. Also note, as the pH number goes higher, the concentration of H+ is gets smaller. That's because these negative exponents indicate that the 10 is actually in the denominator. For example, 10-6 is the same as 1/106, which is one over a million, or one millionth. Again, the H+ concentration is smaller with high pH numbers and greater when the pH number gets smaller. So it's just the reverse of what you might think.
100, 10-1, 10-2, 10-3, 10-4, 10-5, 10-6, 10-7, 10-8, 10-9, 10-10, 10-11, 10-12, 10-13, 10-14 moles per liter.
|
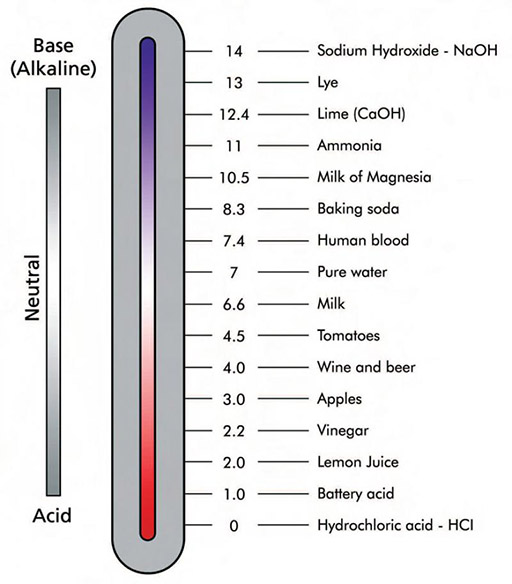 |
Sometimes you see pH values as fractions. For example, in this scale, baking soda has a pH of 8.3. If asked what is the H+ concentration of pH 8.3, you would start off the same. Make it a -8.3 and then make that the exponent of 10. So 10-8.3 moles of H+ ions per liter is the concentration; however, writing 10-8.3 is not an acceptable way to report the concentration. Here you must use a calculator and have it calculate 10 with the exponent of -8.3. That comes out to 5.01x10⁻⁹ moles of H+ per liter. Remember pure water is 1.0 x 10⁻⁷ moles of H+ per liter. So a baking soda solution has about 100 times less H+ ions than pure water. This is expected for something that makes an alkaline solution where the OH- concentration is higher than the H+ concentration.
Now let's try tomatoes that has a pH of 4.5. So that's 10-4.5 moles of H+ ions per liter. That value should be between 1.0x10⁻⁴ and 1.0x10⁻⁵. The calculator shows it to be 3.16 x 10⁻⁵, which is between those values. 3.16 x 10⁻⁵ moles of H+ ions per liter is about 100 times more than that of pure water. That is expected of anything acidic, which has a pH below 7. |
Above when we changed 10-3 moles per liter into pH 3, the formula we could have used is this:
pH = - log[H+]
where [H+] is the concentration of H+ ion (moles per liter) The brackets in chemistry usually mean we are talking about concentration.
To change 10-3 moles per liter into pH 3, let's use the same formula.
pH = - log(10-3)
The "log of a number" is the exponent of 10 that makes that number. In the case of 10-3, it is easy because we see 10 raised to an exponent of -3. So the exponent is -3. The formula then says to take the negative of that exponent. So that would be -(-3), which is just 3.
Notice the brackets around [H+] mean concentration, but when taking the log of a number, parentheses are used instead. That's why the brackets got changed to parentheses when we wrote pH=-log(10-3). The math becomes more difficult if the concentration is not simply a 10 raised to some exponent. For example, if the concentration of H+ ions is given as 3.5 x 10⁻⁴, we will need the entire number (3.5 x 10⁻⁴) written as an exponent of 10. That's what log function will do. So below is the formula:
pH = -log(3.5 x 10⁻⁴)
In a spreadsheet the log can be calculated with
=log(3.5*10^-4)
For some calculators you just write log(3.5*10^-4)
For another example, let's see how pH 7 comes from an H+ concentration of 1x10⁻⁷M (moles per liter). Using the formula above, it says pH = - log[H+]. The [H+] is the concentration. So we have pH = -log (10-7M). To find the log of a number, you find the exponent of 10 that gives you that number. In this example, a concentration of 10-7 makes it easy because it is written with 10 with the exponent of "-7". So the log of 10-7 is simply -7. The formula for pH says pH=-log(10-7), which becomes pH=–(–7). So pH = 7.
Why not have pH simply be the concentration and not get complicated using log? The reason is that the concentration of the H+ ions in various solutions varies greatly. For example, the concentration of H+ ions in your stomach is about billion times more than the concentration of H+ ions in an anti-acid remedy like Milk of Magnesia. Instead of working with these large differences in concentration, the log of the concentration makes the values a lot smaller. In other words, pH 1 for stomach acid compared to pH 10 of Milk of Magnesia is easier to work with than using 1x10⁻¹ (or 0.1) molar H+ for stomach acid and 1x10⁻¹⁰ (or 0.0000000001) molar H+for Milk of Magnesia.
In an acidic solution, [H+]>[OH-], therefore the pH is less than 7. In a basic solution, [H+]<[OH-], and the pH is greater than 7. The higher the pH, the more basic the solution: the lower the pH the more acidic the solution.
|
| Measurement of pH: There are various ways of measuring pH of a water solution. There are pH paper strips, plant extracts, man-made chemicals that change color with pH, and electronic pH meters. |
pH indicators in the form of paper strips |
|
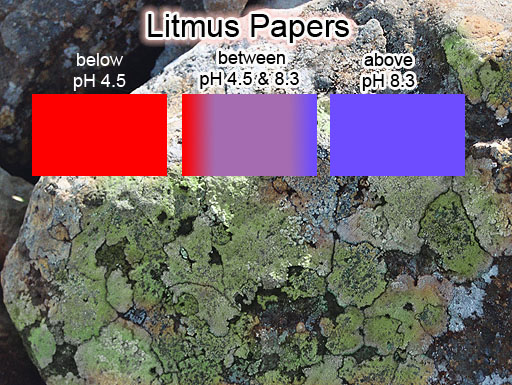
LITMUS PAPERS: Litmus paper is usually made from about 10 to 15 dyes that are extracted from lichen (a fungus). In the desert we often see rocks with lichen on the shady side of the rock. It's usually green but can also be other colors. The dyes turn blue if in alkaline solutions. However, when in acidic solutions, the dye turns to a red color. So blue litmus paper turns red if the solution is moderately to highly acidic (pH<4.5). Red litmus paper turns blue if in an alkaline solution (pH>8.3). In between these pH levels it is purple.
The word "Litmus" is from an Norwegian word, "Litmos". "Lit" means "light" or "colored" and "mos" means "moss", a plant similar to lichen.
|
|
Universal pH Paper: To the left is a typical universal pH paper that measures the "full" pH range of "1 to 14" or "0 to 14". This paper usually has 4 squares to indicate the color. Each square has a different dye because different dyes will change colors over different ranges of pH. You match the 4 colors with the closest 4 colors on the pH chart that comes with the pH paper. |
pH indicators in the form of Plant Extracts |
|
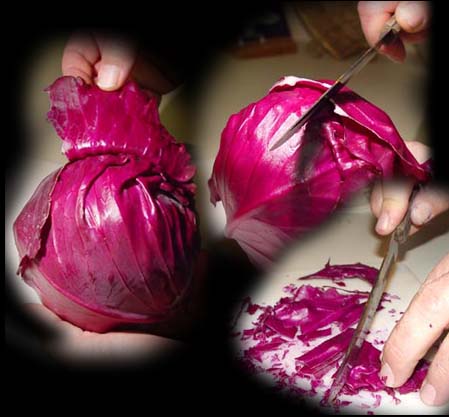
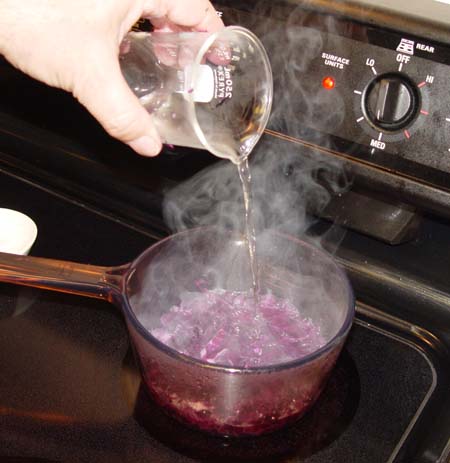
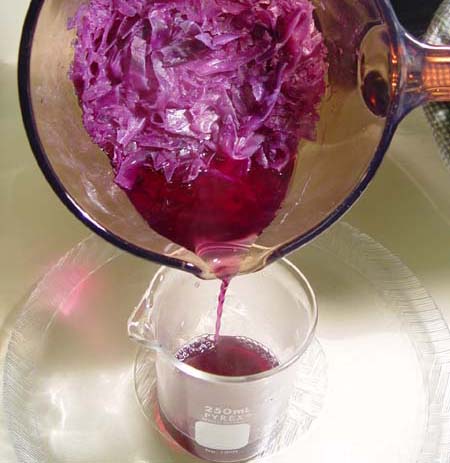
RED CABBAGE EXTRACT: The pigment in red cabbage is a very good pH indicator because it changes colors over the whole pH range. The purple color of "red" cabbage is when the pigment is in a more neutral (pH 7) environment. In very acidic conditions, the color is red. In alkaline solutions, it will be go from blue to green. (Images shown below). |
|
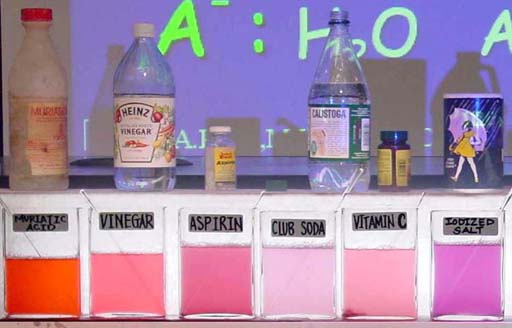
RED CABBAGE EXTRACT: To the left are the colors of red cabbage extract (pigments) when in various acidic solutions. The items are the right range from about pH 1 to pH 7. Iodized salt is pH 7. Muriatic acid (hydrochloric acid/HCl) is the highest concentration of H+ ions. Vinegar, aspirin, club soda, and vitamin C transition to lower concentrations of H+. |
|
RED CABBAGE EXTRACT: To the left are colors of red cabbage extract when in alkaline (basic) solutions. Baking soda solution is slightly alkaline with washing soda, ammonia water, and lye (sodium hydroxide) having higher levels of hydroxide ions (OH-) but lower levels of H+ ions. I would estimate the pH of these as 7, 8, 10, 12, 14. |
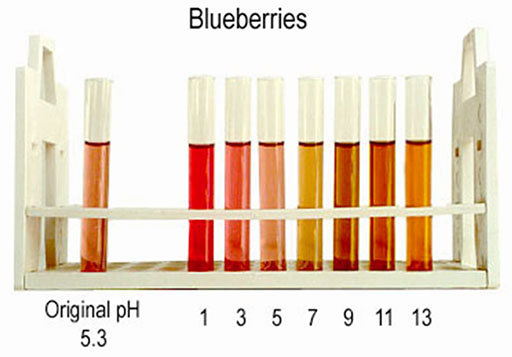 |
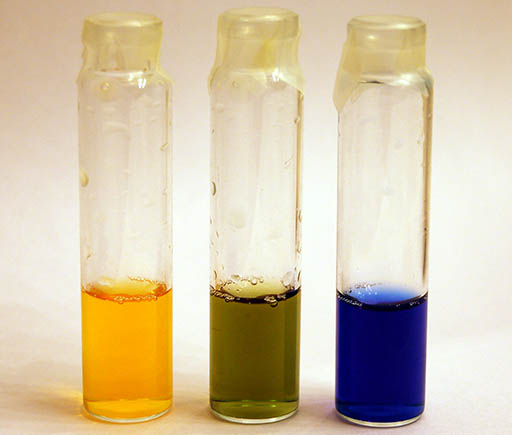
BLUEBERRY EXTRACT: To the left are colors of blueberry extract (blueberry juice) at different pH levels. Notice that natural blueberry juice has a pH of about 5.3 (slightly acidic). At more acidic levels is it more red. At alkaline pH it is more brown. As you can see the color change isn't as dramatic as it is for red cabbage extracts.
Extracts from red grapes, apple skins, other colored fruit and vegetables will change their colors depending on the pH. Making an extract can be done by chopping or grinding the plant, then boiling it in water or soaking it in a solvent like acetone. Either way, this extracts the colored pigments. |
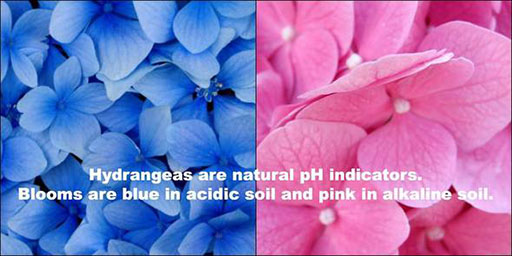 |
The flowers called "hydrangeas" are natural pH indicators. The flowers are blue in acidic soil (around pH 4.5). They are purple in slightly acidic pH levels (5-6). Then they are pink in neutral or alkaline soil (7-9). Soil additives can be used to change the pH and therefore the color of these flowers. |
 |
The old favorite poem starter "Roses are Red, Violets are Blue..." has a new explanation. The pH in violets is probably different than the pH in roses.
There's been an effort to genetically modify roses to make them blue, but they haven't yet controlled the pH, so no success yet.
If the colored pigments in flowers were extracted, many of those would probably be good as pH indicators. |
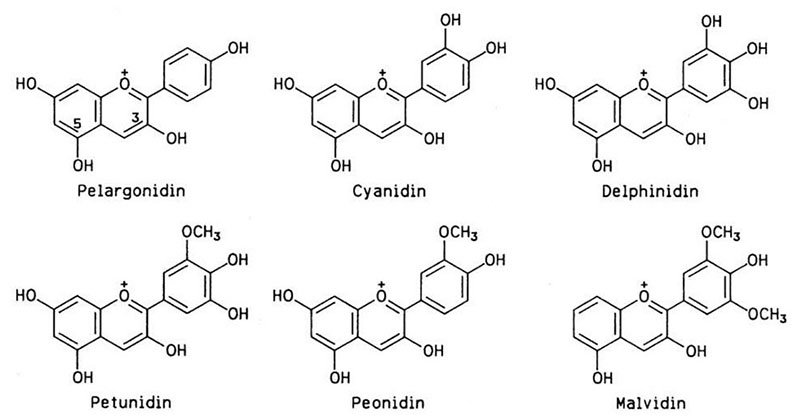
The purple and blue pigments found in fruits, vegetables (like red cabbage), and flowers are usually from a class of compounds called "anthocyanins". Below are some of common ones. Notice they are all variations of a three 6-carbon ring structure. The double lines represent double bonds. Notice that the double bonds alternate with single bonds. When this happens, electrons in those bonds can jump to higher energy levels that are equal to the energy of visible wavelengths of light. This allows these electrons to absorb light in the visible light spectrum. Raising the pH (higher alkalinity) causes hydrogen atoms on some of the OH groups to be pulled off which changes the colors (energies) they can absorb. This ability to change the colors depending on pH makes them good pH indicators.
 |
Man-Made pH Indicators |
| |
Wikipedia lists about 25 man-made chemicals that change color with pH (pH indicators). Here is the URL if you want to check it out:
http://en.wikipedia.org/wiki/PH_indicator |
|
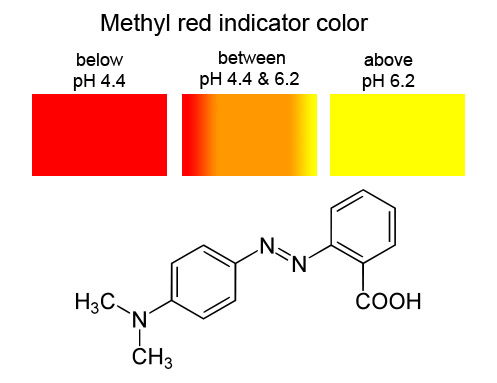
Methyl red: Methyl red dye is red at pH 4.4 or lower. It is yellow at 6.2 or higher. The name "methyl" comes from the two methyl groups (written as CH3 and H3C) on the left end of the molecule shown. |
|
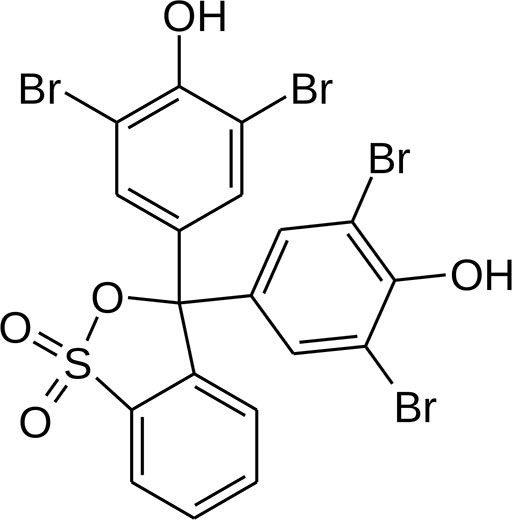
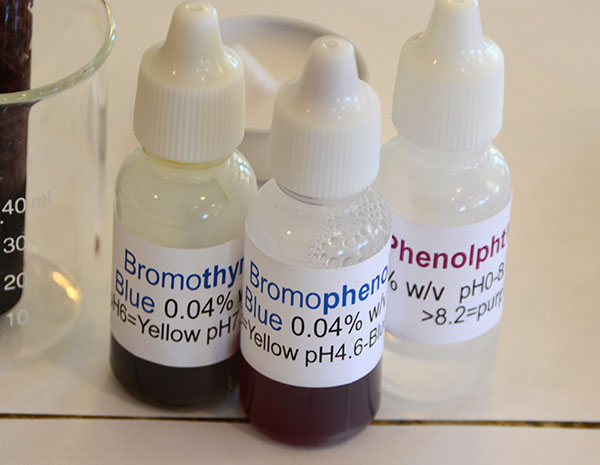
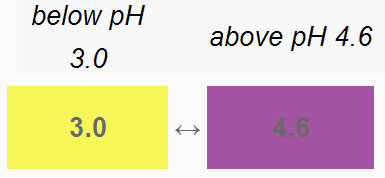
Bromophenol Blue: This pH indicator is in your kit. It was used in lab 7 to check the acidity of water that reacted with sulfur dioxide that came from burning sulfur. It caused the water to turn yellow which means the pH was at 3.0 or lower (more acidic). Notice in the image the yellow color at pH 3.0 or lower.
The name "phenol" refers to the rings that have an "OH" group on it. Phenol is a solvent that has one 6-carbon ring with a single OH group attached.
You may notice that like the pH indicators from plants, these man-made pH indicators also have 6-carbon rings that have double bonds alternating with single bonds. Visible light can cause these electrons to jump to higher energy levels, which means the color that causes that jump gets absorbed. So the reflected color is no longer white. For compounds that don't have these alternating double bonds, only high energy ultraviolet light can cause the electrons to jump to higher energy states. Visible light is not absorbed, so compounds without the alternating double bonds appear clear or white. Groups like OH, COOH, CO, and even nitrogen atoms are affected by H+ and OH- ions in solution because H+ and OH- ions may add or remove charges on the indicator molecule. Different charges on the molecule causes it to absorb different frequencies of light, so it changes color. |

Bromothymol Blue molecular structure
|
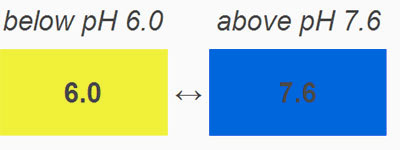
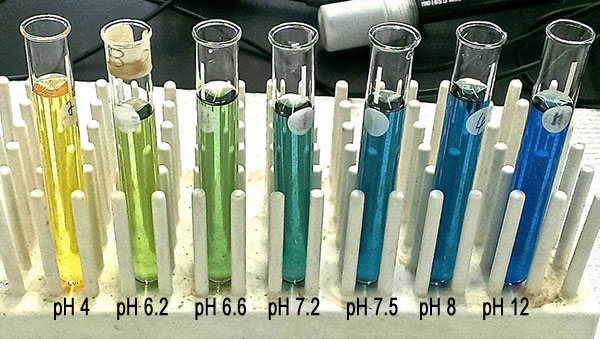
Bromothymol Blue: This pH indicator is in your kit. Because it changes colors in slightly acidic to slightly alkaline solutions, it is used for situations that are checking pH places like swimming pools or fish tanks where the pH shouldn't vary too far from neutral pH (7).
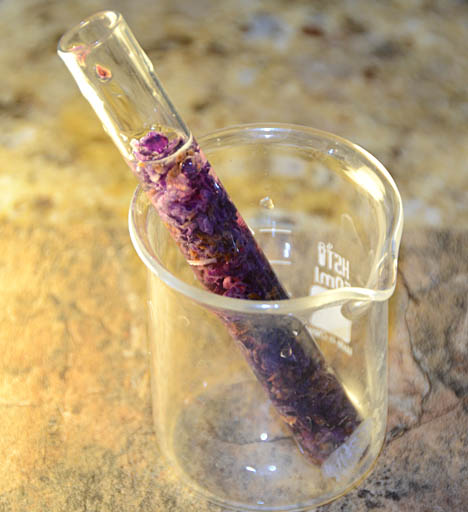
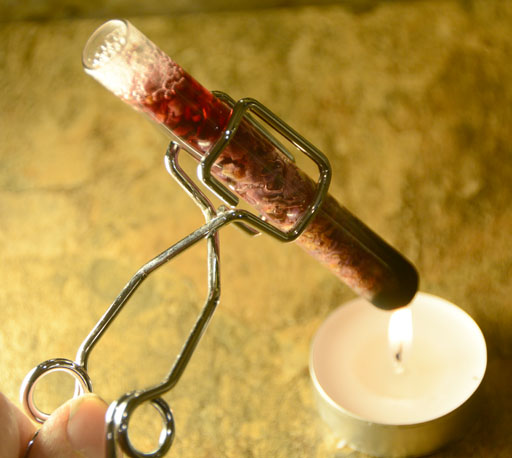
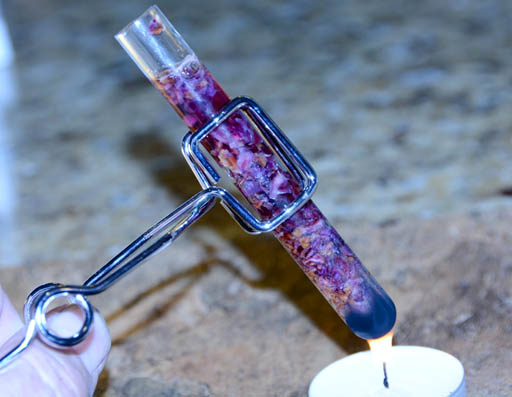
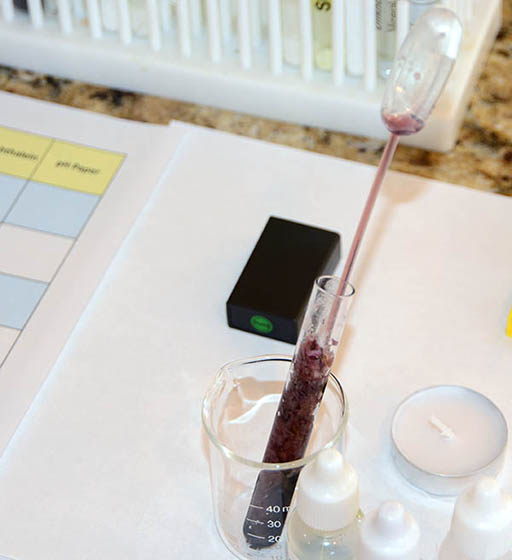
Looking at the photo, notice that at pH 6.0 and below a solution with bromothymol is yellow. At a neutral pH it is green. At 7.6 and above it is blue. So it changes color over a rather narrow range of H+ concentration. In this lab we will show that the CO2 in your breath can change slightly alkaline water into acidic water.
Bromothymol blue is sometimes used prior to a birth to detect if the membrane surrounding the baby has broken. The amniotic fluid that surrounds the baby has a pH above 7.6. So it would turn the Bromothymol blue to a blue color.
The molecular structure of Bromothymol Blue is similar to bromophenol above except two bromine atoms were replaced with an isopropyl group (a carbon with two methyl (CH3) groups attached. Isopropyl groups look like "Y's" in the image.
"Thymol" is in the name "bromothymol" because thymol has a 6-carbon ring with bromine, OH, and isopropyl groups. As the name suggests, thymol comes from the spice called "thyme". Thymol, by the way, has antibacterial qualities.
The below image shows color changes even in the narrow range of pH 6.2 to 7.5.
|
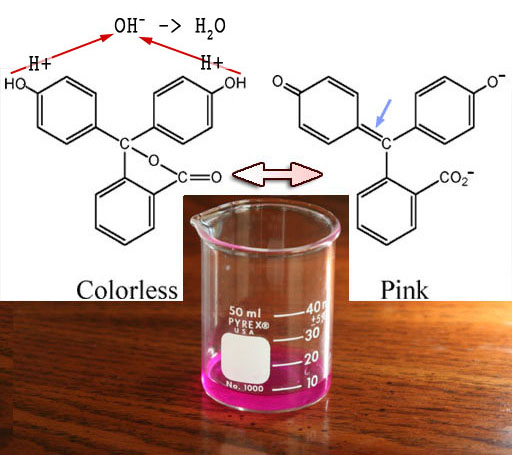 |
Phenolphthalein: This pH indicator is also in your kit. This was used in Lab 4 to show that when sodium bicarbonate or sodium carbonate dissolve, they cause excess OH- (hydroxide) groups to form in the water. That makes the water alkaline. The OH- groups also pull off the hydrogen atoms of the OH groups on the phenolphthalein molecule. That changes the arrangement of double bonds on the phenolphthalein molecule so that they alternate throughout the molecule. That gives it the ability to absorb all colors except pink, which makes the solution pink (reddish purple=fuchsia/pronounced few-shuh).
|
|
Phenolphthalein is used to show when acids get neutralized because the solution will go from clear to pink immediately after the acid gets neutralized.
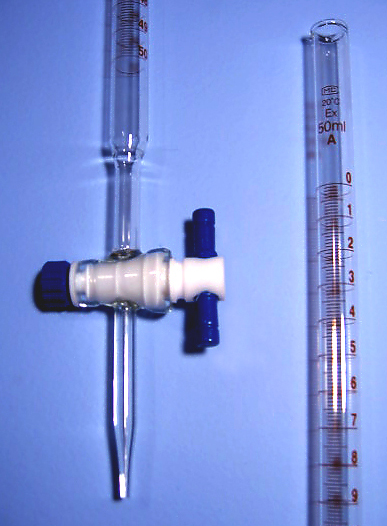
Using a buret (shown) to drip in an alkaline solution like sodium hydroxide (NaOH), the amount of NaOH used to neutralize the acid can be measured at the point the solution with phenolphthalein goes pink. That will allow a calculation of how much acid was present. This is useful for determining the strength of acids like battery acid, vinegar (acetic acid), and even organic acids like Aspirin and citric acid. |
Electronic pH Meters |
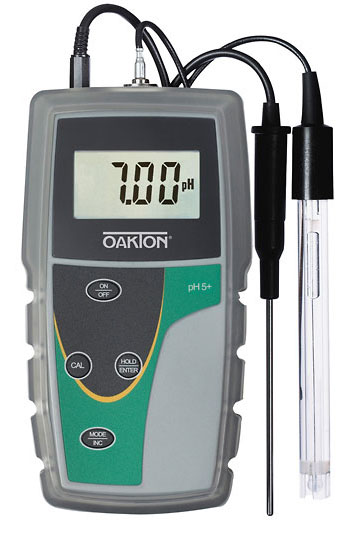 |
pH meters consists of three parts. One part is a glass sensor probe whose voltage changes depending on the H+ concentration in the solution. The second part is an electronic amplifier that reads that voltage and amplifies it. Then that elevated voltage is turned into a digital readout display. In this picture the glass pH sensor probe is on the right. The metal probe is to read the temperature of the solution. This allows the sensor to correct the pH values when the temperature is not a standard 25°C (77°F). |
|
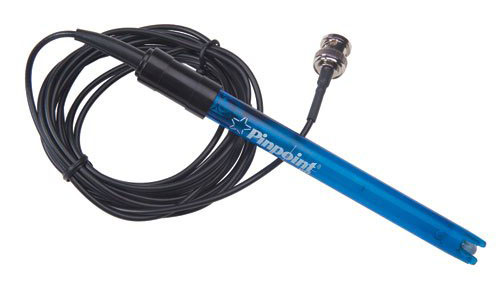
Here is a pH probe which can be purchased separately for about $50. Notice that it has a connector which can attach to a pH meter. The metal connector end is usually a BNC connector which allows it to turn and lock onto the meter's connector plug. |
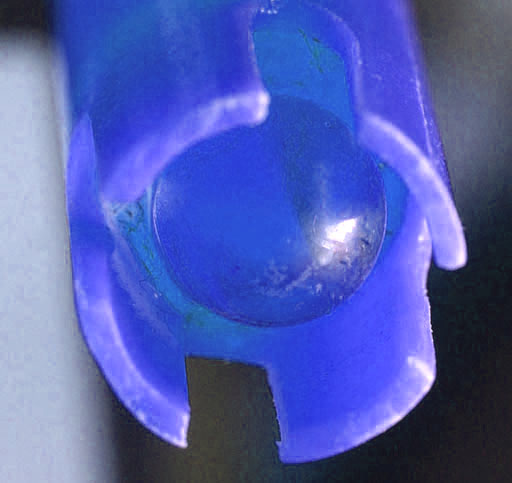 |
Here is an extreme close up of the tip of the pH probe. Notice that it has a thin delicate glass bulb. It has a very thin coating of gel which only allows the very small H+ ions to enter. When they do, this changes the voltage of the probe and that is used to measure the pH. |
|
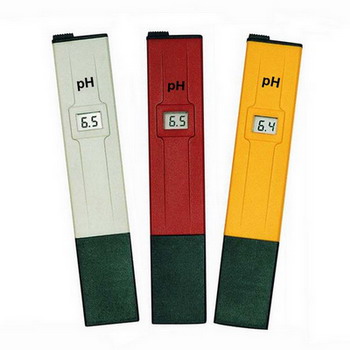
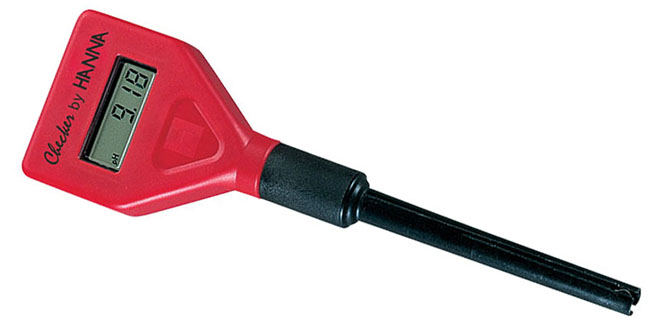
The cheaper pH meters have the glass pH probe built into the body. There are accurate to about a tenth of a pH. In the past even these "cheap" meters were about $100, so they weren't in the kit; however, in late 2014, some were discovered that only cost about $10. So in the Spring of 2015, they were added to the kit. |
Below is a benchtop pH meter. Notice this is accurate to the thousandths place. By changing the probes, these meters can read the concentration of other ions other than just H+ ions.
 |
|
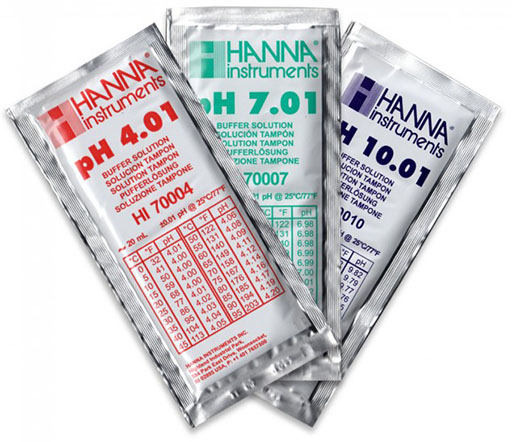
Whether it's a cheap or expensive pH meter, they are supposed to be calibrated on a regular basis using solutions of known pH values. Usually, these reference solutions are in the acid, neutral, and alkaline ranges. Here they use pH of 4.01, 7.01, and 10.01 to represent those different pH levels. For example, the contents of the pH 4.01 bag is placed in a beaker. The pH probe is placed in the solution and the pH meter is adjusted to read out 4.01. That makes it calibrated for acidic solutions. The same thing is done with the 7.01 and 10.01 bags (often these solutions come in bottles instead of seal bags). |
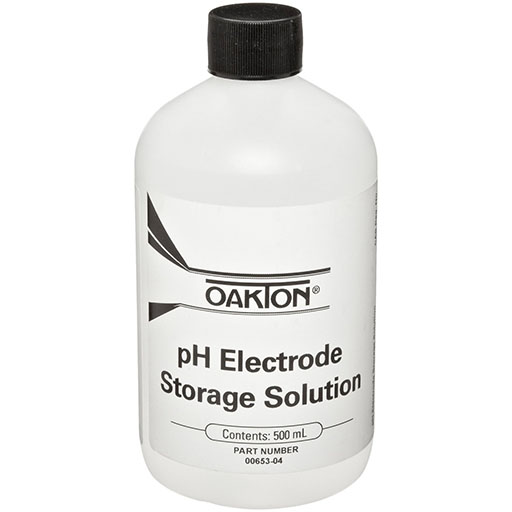 |
Because the tip of the glass pH sensor has a water saturated gel coating, it is important that the glass tip of of some pH sensors not dry out. That is why these pH probes are stored in a solution. Typically the solution is a 3.3 moles per liter solution of potassium chloride (KCl). |
This pH meter is advertised for use in making beer.
 |
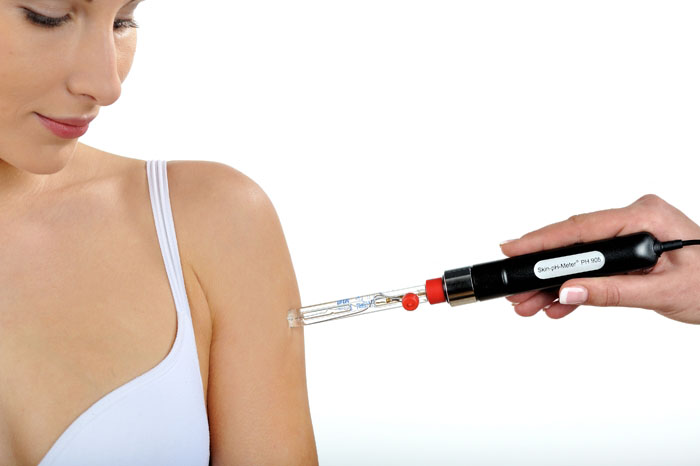
The below pH meter is designed to measure the pH of skin. They found that healthy skin is just under pH 5, which is acidic. Apparently, acidic skin fights off many types of bacteria and helps the skin cells form a better shield by staying more tightly packed.
 |
Here an iPhone is turned into a pH meter by using a pH adapter (an amplifier). All that is needed is to attach a pH probe (like shown early on) to the BNC connector. The phone will provide the readout and logging of the pH. Notice that the screen is also showing the temperature which means it can adjust the pH value to be more accurate for temperatures away from the standard 25°C (77°F).
 |
Buffer Solutions |
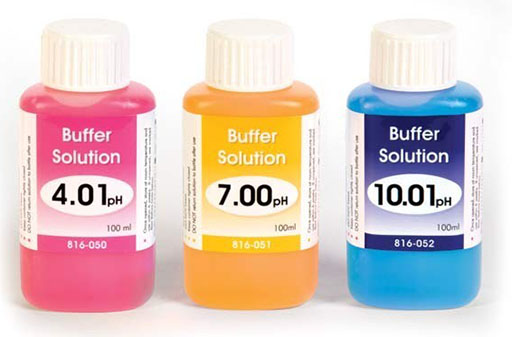 |
As mentioned earlier reference solutions of pH are used to calibrate pH meters. All of them are sold as a buffered solution. A buffer solution resists change in pH if a small amount of acid or base gets introduced to the solution. For reference solutions, the buffered solution helps guarantee that their pH stays constant. |
| |
A buffer in chemistry is a solution that resists any change of pH. A change in pH happens if H+ ions are added or removed, or if OH- ions are added or removed. A buffer can absorb (neutralize) any added H+ or OH- ions, and it can replenish any H+ or OH- ions that are getting removed. |
Phosphoric acid: H3PO4
In water, about one out of every 10 phosphoric molecules dissociate into an H+ ion and a
H2PO4- ion.
H3PO4 → H+ + H2PO4-
This means if you had 20 phosphoric molecules, there would be two that would have dissociated into H+ and H2PO4- ions. |
It usually takes two compounds to do this. If this is a buffer that is trying to a hold a specific acidic pH (less than pH 7), then it will contain a weak acid that releases H+ ions if the number of H+ ions go down, and another compound that can absorb H+ ions if the number of H+ ions increase.
First let's look at what a weak acid does. One example is phosphoric acid (H3PO4). which is used in sodas to make them taste more tart. Phosphoric acid is called an acid because the hydrogen atoms can break away from the phosphoric acid molecule while leaving their electrons behind. So the hydrogen atoms become H+ ions. If one hydrogen leaves, the other part of the phosphoric acid now has a negative charge and is now called an dihydrogen phosphate ion (H2PO4-).
Phosphoric acid is called a weak acid because it doesn't release all of its hydrogen atoms (as H+ ions) into the water. Only about 1 out of every 10 phosphoric acid molecules will be dissociated into H2PO4- and H+. Strong acids like hydrochloric acid (HCl) release all of its hydrogen atoms (as H+ ions) into the water. |
A weak acid is actually a pretty good buffer if it only encounters something alkaline that neutralizes or removes the H+ ions in the solutions. Consider an example of putting 20 molecules of phosphoric acid into water. Remember, phosphoric acid has the tendency to release one H+ ion for ever 10 molecules of phosphoric acid. So in this case 20 molecules of phosphoric acid there would be 2 H+ ions and 2 H2PO4- ions.
H3PO4 H3PO4 H3PO4 H3PO4 H3PO4 H3PO4 H3PO4 H3PO4 H3PO4 H3PO4 H3PO4 H3PO4 H3PO4 H3PO4 H3PO4 H3PO4 H3PO4 H3PO4
H+ H2PO4- H+ H2PO4-
You might think that if you added 5 OH- ions, that the two H+ ions in solution would get turned into water by combining with 2 OH- ions. Then the pH would go from acidic to alkaline because there would then be 3 OH- ions in the solution. Notice below that two H+ and OH- ions have formed water (HOH), which is another way to write H2O.
H3PO4 H3PO4 H3PO4 H3PO4 H3PO4 H3PO4 H3PO4 H3PO4 H3PO4 H3PO4 H3PO4 H3PO4 H3PO4 H3PO4 H3PO4 H3PO4 H3PO4 H3PO4
HOH H2PO4- HOH H2PO4-
OH- OH- OH-
The 3 OH- ions do not stick around because 3 phosphoric acid molecules can give one H+ ion each directly to the 3 OH- ions turning the OH- ions into water (HOH).
3H3PO4 + 3OH- → 3H2PO4- + 3HOH
At this point our solution has 15 phosphoric molecules, 5 dihydrogen phosphate ions, and 5 extra water molecules.
H3PO4 H3PO4 H3PO4 H3PO4 H3PO4 H3PO4 H3PO4 H3PO4 H3PO4 H3PO4 H3PO4 H3PO4H3PO4 H3PO4
H2PO4- H2PO4- H2PO4- H2PO4- H2PO4-
HOH HOH HOH HOH HOH
Notice above that there are no H+ ions or OH- ions. So it seems that the solution would be neutral (pH 7); however, recall that about 1 out 10 phosphoric molecule will dissociate to form H+ and H2PO4-- ions. So with 15 molecules of phosphoric acid left, they will on average keep 1.5 H+ ions in solution. Therefore the concentration went from the original 2 H+ ions in solution to 1.5 ions in solution. So the pH didn't change much. So that shows that phosphoric acid or other weak acids can buffer against addition of something alkaline like OH-. However, by itself, weak acids cannot keep the pH constant if acids (more H+ ions) are added. Let's examine that situation.
Below again is what 20 phosphoric acid molecules look like in water.
H3PO4 H3PO4 H3PO4 H3PO4 H3PO4 H3PO4 H3PO4 H3PO4 H3PO4 H3PO4 H3PO4 H3PO4 H3PO4 H3PO4 H3PO4 H3PO4 H3PO4 H3PO4
H+ H2PO4- H+ H2PO4-
Now if 6 molecules of hydrochloric acid (HCl) is added, that will introduce 6 more H+ ions to the 2 H+ ions already present. The only thing that can absorb these extra H+ ions are the negative dihydrogen phosphate ions (H2PO4-). But there are only two of them. So below is what happens with 6 H+ ions. Notice that 2 of these 6 turn the H2PO4- into H3PO4 (phosphoric acid). Note, I am writing the newly formed H3PO4 (phosphoric acid) as HH2PO4, just to show that one of these hydrogen atoms came from hydrochloric acid. Below is the result.
H3PO4 H3PO4 H3PO4 H3PO4 H3PO4 H3PO4 H3PO4 H3PO4 H3PO4 H3PO4 H3PO4 H3PO4 H3PO4 H3PO4 H3PO4 H3PO4 H3PO4 H3PO4
H+ HH2PO4 H+ HH2PO4
H+ H+ H+ H+
Now we went from 2 H+ ions to 6 H+. So the concentration of H+ tripled, which means the pH went up significantly, too. So phosphoric acid by itself is not a good buffer against the addition of acids. One fix is to have more of the H2PO4- ions that can grab H+ ions. We can supply those H2PO4- ions with another compound such as sodium dihydrogen phosphate (NaH2PO4). This compound dissolves in water to form Na+ ions and the H2PO4- ions we want. So by having a mixture of phosphoric acid and sodium dihydrogen phosphate (NaH2PO4), the phosphoric molecules can replenish H+ ions if something alkaline is added, and the extra H2PO4- from NaH2PO4 can absorb H+ ions if an acid is added. That is a true buffer. |
Buffering actions are very important in the human body because enzymes are only active in a narrow range of pH. The pH value of blood must be maintained close to 7.4 (slightly basic/alkaline). Buffers in blood keep the pH value almost constant even if acidic foods are eaten or lactic acid is produced in the muscles during exercise. The compounds in blood that act as buffers are H2CO3 (carbonic acid) and HCO3- (bicarbonate ions). As you might guess, H2CO3 can replenish H+ ions if something alkaline is introduced and HCO3- can absorb extra acids (H+).
H2CO3 → HCO3- + H+ HCO3- + H+ → H2CO3 |
| A buffer like the 4.01 pH solution above is usually created from a weak acid and a salt of the same acid. For example, your kit has acetic acid (CH3COOH). If it also had sodium acetate (CH3COONa), then you could make a good buffer in the pH range of 3.8 to 5.8. Actually, your kit has 0.1 M NaOH, which would allow you to turn acetic acid into sodium acetate. CH3COOH + NaOH → CH3COONa + HOH (H2O) |
Measuring the pH of Household Products (continued) |
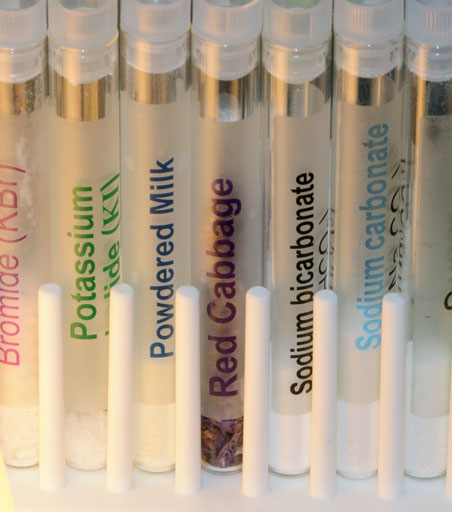
You will be measuring the pH of the following household items, which are all in your kit (even those assembled for Fall 2014).
Washing Soda
(Sodium carbonate)
(Na2CO3) |
Baking Soda
(Sodium bicarbonate)
(NaHCO3) |
Milk of magnesia
(Magnesium hydroxide)
Mg(OH)2 |
Milk
| Vinegar
(5% acetic acid)
CH3COOH |
Lemon juice
(has citric acid) |
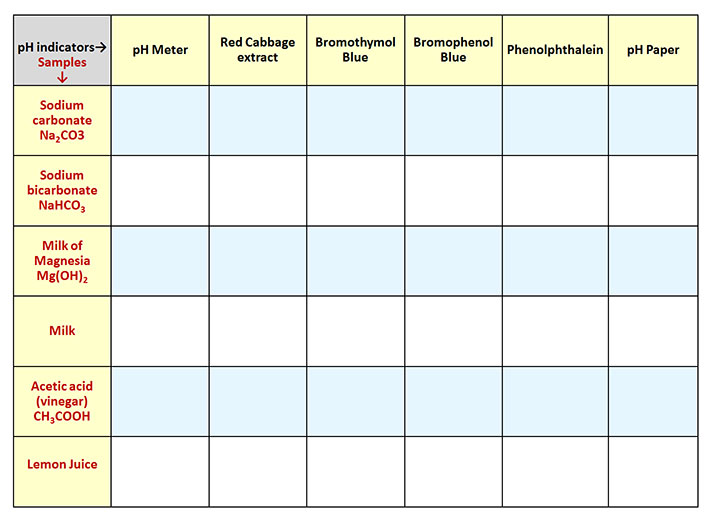
The pH of each will be measured by using a pH Meter, red cabbage extract, three man-made pH indicators, and Universal pH paper.
pH Meter |
Red Cabbage |
Bromothymol Blue |
Bromophenol Blue |
Phenolphthalein |
Universal pH paper |
|
|
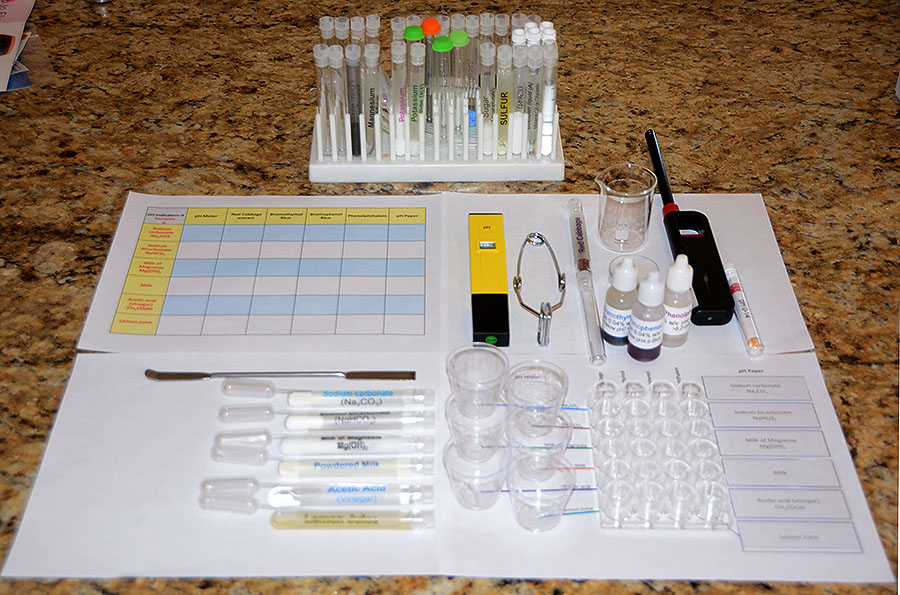
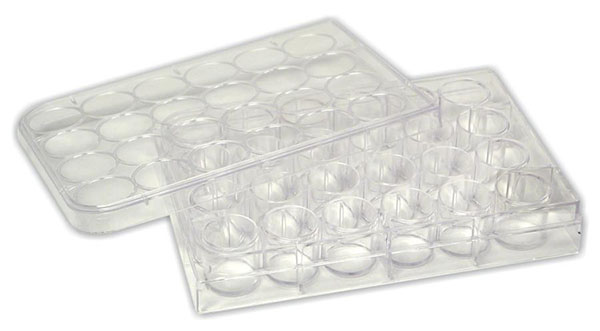
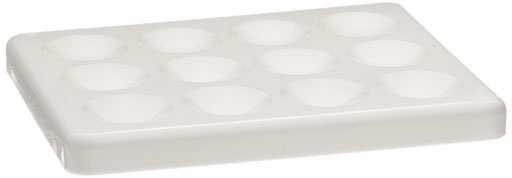
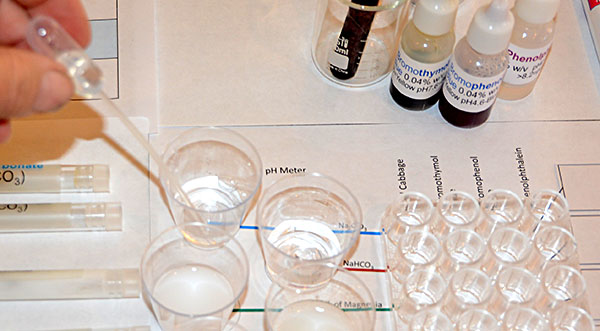
Since there are six items to test and six ways to measure pH, that means there will be 36 (6 x 6) tests to do. The challenge is to stay organized and to record the results as you go. Typically, these kind of multiple tests are done using porcelain spot plates (see below). Spot plates allow you to do several tests on the same plate. Unfortunately, these have only 12 depressions. So instead of the white porcelain spot plates, your kit uses plastic reaction well plates which have 24 depressions and therefore can test 24 samples (left image). These also have a lid. These are also called "reaction well plates", "culture plates", or "microplates".
|
|
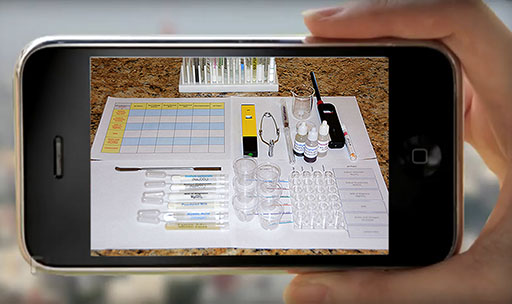
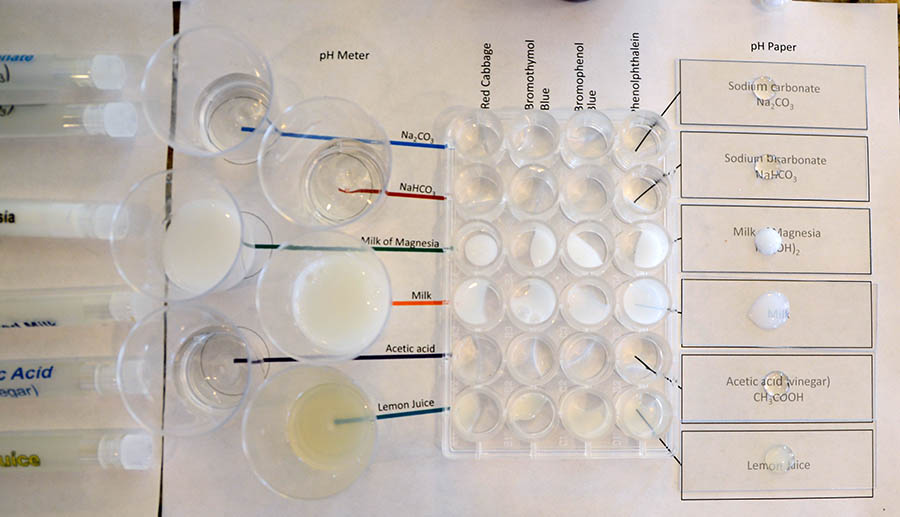
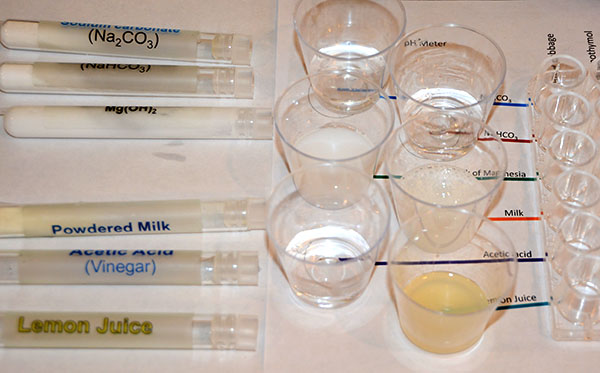
The setup is shown again below. Once you have your setup done, take a photo of it. |
|
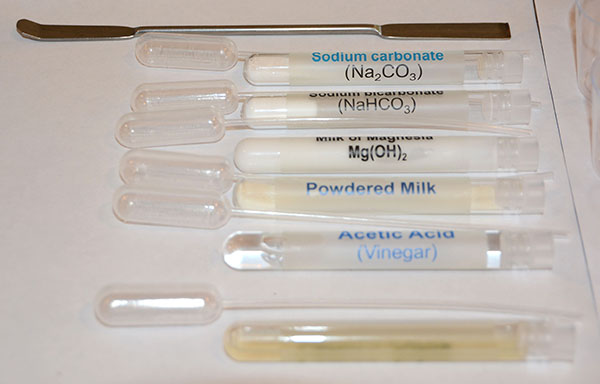 |
On the left are the six household products that you will be testing. The bottom test tube is one labeled lemon juice. Line them up in the order shown. That way they will match the order shown on the paper that labels the cups, spot plates, and microscope slides.
Note that each test tube should have its own pipette. |
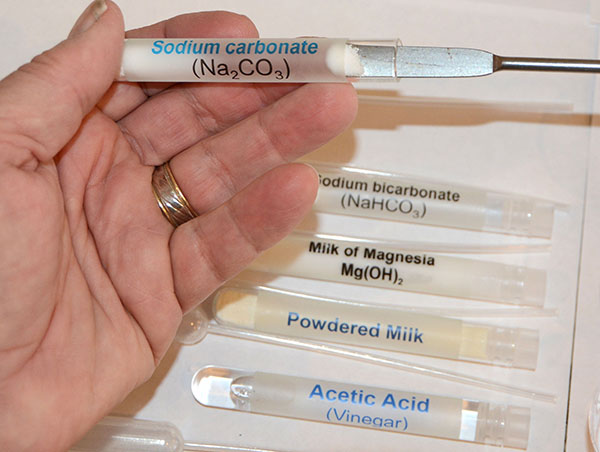 |
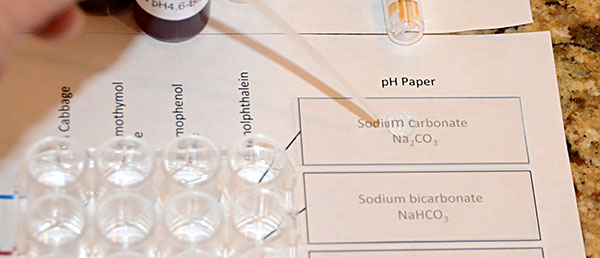
Begin by using the microspatula to remove a small amount of the sodium carbonate (washing soda/Na2CO3). That will be put into the cup that is labeled "Na2CO3" |
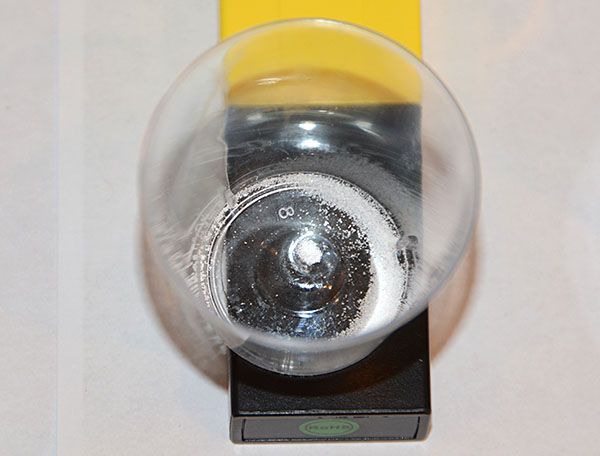 |
This picture shows that cup with that amount of sodium carbonate. It's placed over a black background so it is easier for you to see about how much is used. |
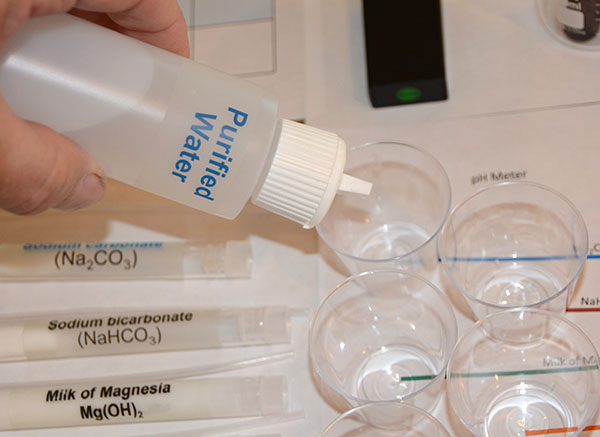 |
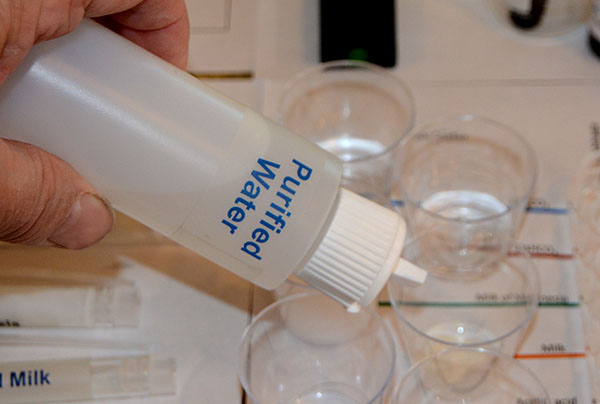
Use you Purified Water bottle to add some distilled (purified) water. See image below for about how much you should add. |
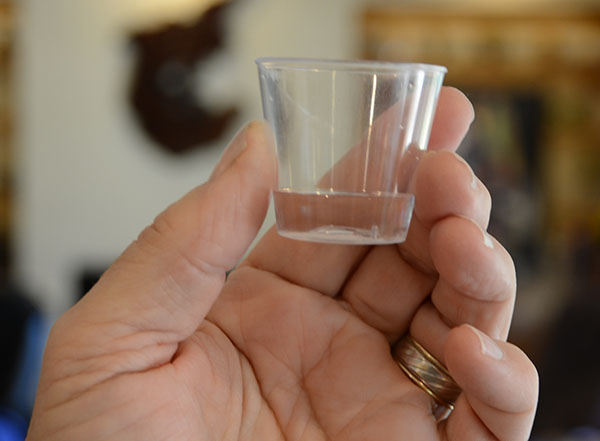 |
Fill it to about the level shown or a little higher. |
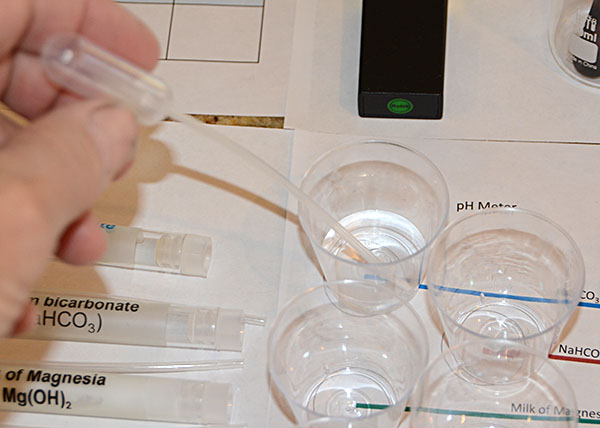 |
Use a pipette to pull water into the pipette and then push the water back out. Do that 4 or 5 times. That will stir the contents of the cup and dissolve the sodium carbonate. Place the pipette back along side the Sodium carbonate test tube. Only use this pipette for transferring liquid from the sodium carbonate cup. |
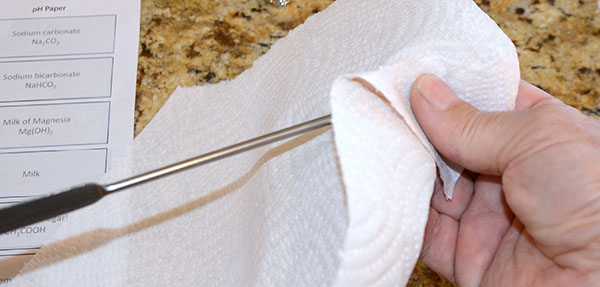 |
Wipe off any sodium carbonate residue on the microspatula with a paper towel. |
 |
Do the same thing you did with sodium carbonate with the second test tube (sodium bicarbonate/NaHCO3).
1. Use the microspatula to remove a small amount of it and put it in the cup that is sitting on the circle labeled NaHCO3.
2. Add some purified water to it. (about the same amount as was done for sodium carbonate)
3. Use a clean pipette to draw the liquid into the pipette and then squeeze the liquid back out to stir the contents. Doing that a few times will dissolve the sodium bicarbonate (NaHCO3).
4. Place the pipette back alongside the sodium bicarbonate test tube. Don't get the pipette mixed up with the ones used for the other products. |
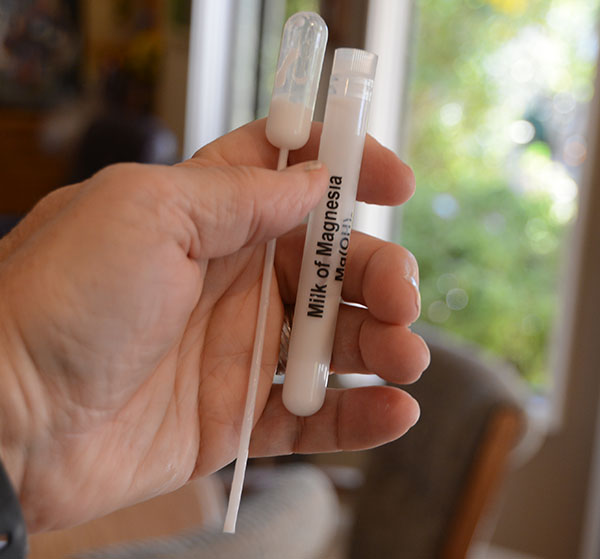 |
The third test tube is Milk of Magnesia. This is a viscous liquid. So use another clean pipette to pull out some of the Milk of Magnesia. The image on the left shows you about how much Milk of Magnesia you need. Place that amount into the cup that is marked for Milk of Magnesia. Add some purified water to bring up the volume to the level that you used for the first two cups. Use the same pipette that you used to transfer the Milk of Magnesia for to draw up some of the water and milk of magnesia mixture. Push out the mixture and repeat that until the milk of magnesia is mixed well with the water. |
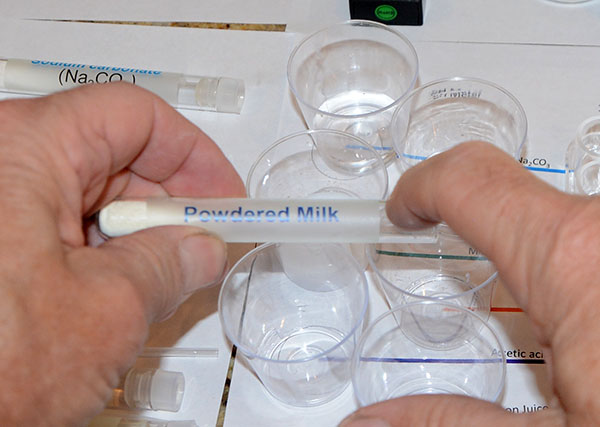 |
The next test tube is Powdered Milk. You can either used the microspatula to get out a small amount of the powdered milk, or you can tap on the test tube to get some of it to fall into the cup that has a line to it labeled "Milk". Use an amount that is similar to the amount you used for sodium carbonate or sodium bicarbonate. |
 |
Like the others, add some Purified Water to dissolve the powdered milk. Use a clean pipette to draw the water/milk mixture up into the pipette. Squeeze it out and repeat that until the powdered milk appears to be dissolved. It won't be clear but it should be well mixed. |
 |
The next test tube is labeled "Acetic Acid (Vinegar)". Pour all of its contents into the cup that is on the line marked "Acetic Acid".
The last test tube is "Lemon Juice". Pour all of the lemon juice into the cup that sits on the line marked "Lemon Juice".
Now with all of these cups filled with their respective household product, you are ready to measure their pH using the pH meter. |
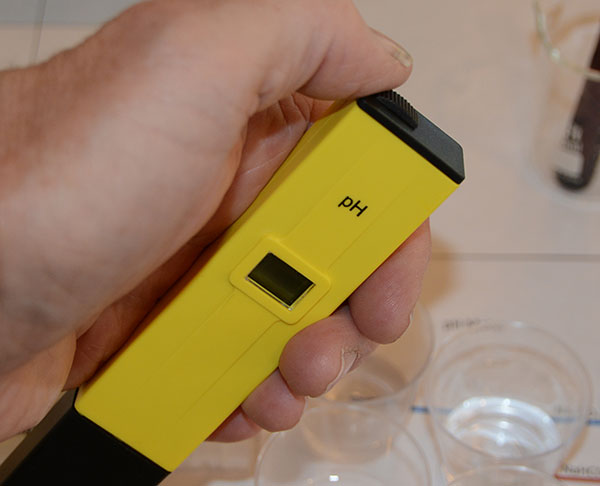 |
Now pick up the pH meter and turn it on using the black slide switch on the top. When on, numbers in the small LCD window should appear. |
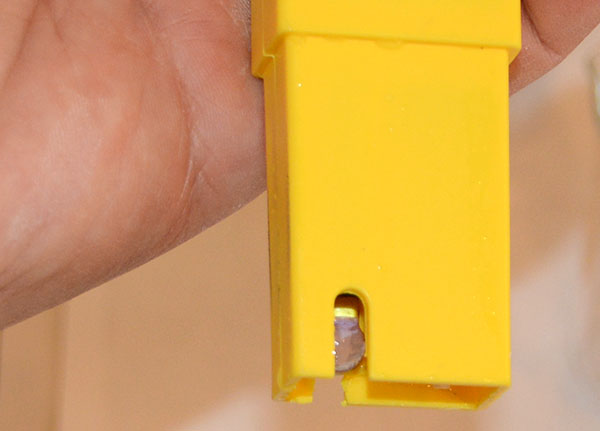 |
Remove the black protective cap from the bottom of the pH meter. You will now see the small glass sensor probe that it uses to measure pH. The liquid it tests needs to cover the bulb. |
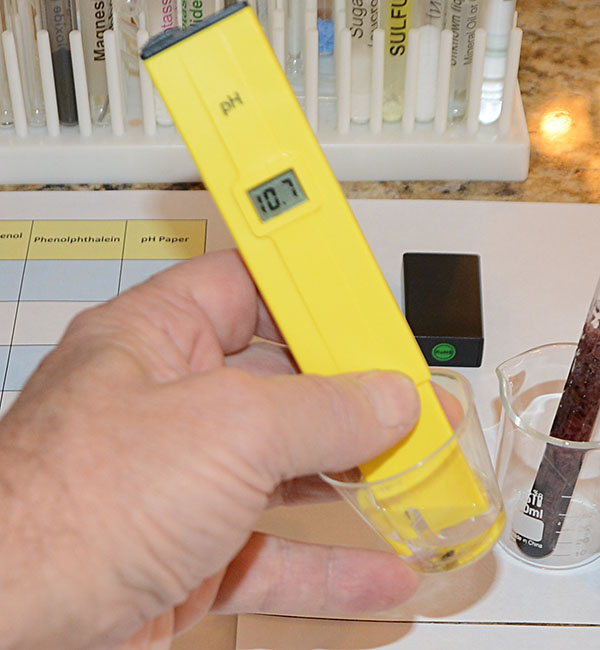 |
Test the first cup, which is the one with the dissolved sodium carbonate (washing soda). Noticed that the cup was tilted to get the liquid deep enough to cover the glass sensor probe. In this image, one had was used because the other hand was busy taking the photo. In your case, use two hands. |
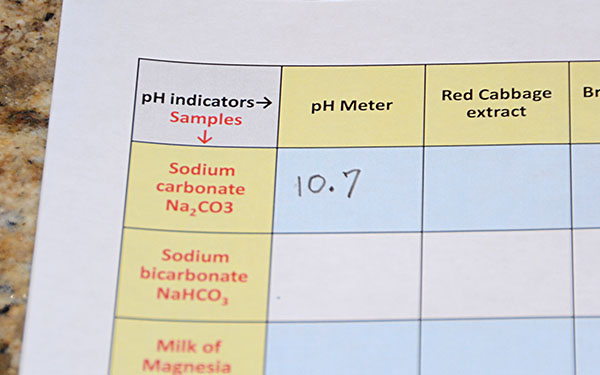 |
The pH of 10.7 was recorded. You should record whatever pH your meter says. |
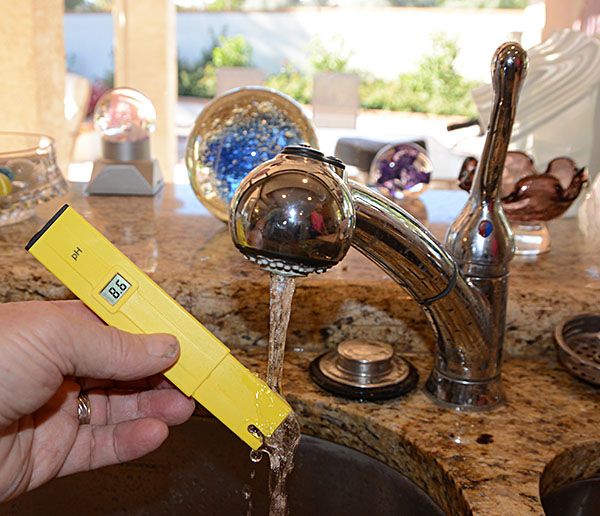 |
After the pH of the sodium carbonate is measured, there is still some of that liquid coating the glass probe. So that needs washed off. You can use the water from a faucet. |
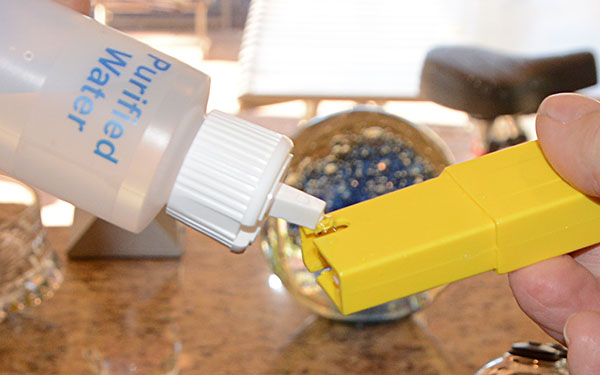 |
After rinsing with tap water, it's a good idea to rinse off the glass probe with some distilled water. However, if you are low in distilled water, you can skip that.
The pH meter is now ready to measure the pH of a different liquid. In this case it will be the sodium bicarbonate. |
|
Just like the pH was measured for the first cup. The pH of the other 5 cups needs to be done. Remember after each pH is taken, record the pH on the data sheet and rinse off the pH meter. |
 |
These were the pH readings gotten using the samples in our test kit. Your readings will vary somewhat depending on the amount of sample you used and how much water you used to dissolve it. Also, temperature can change pH a little. |
 |
Now that you've finished measuring the pH of these liquids using a pH meter, you can use the liquids to check pH with the use of pH indicators.
Using the pipette that was used to mix the sodium carbonate, use it to transfer some of the dissolved sodium carbonate (Na2CO3) to the 4 spot plate wells on the top row of the spot plate. |
|
You only need about 3 or 4 drops of the sodium carbonate liquid for each well. |
|
Also, on top of the microscope slide that is marked for Sodium carbonate, add 3 or 4 drops of the sodium carbonate solution. |
| Next do the same thing with sodium bicarbonate (NaHCO3). Be sure to use the pipette that was used when the sodium bicarbonate was being dissolved in its cup. Then do the other 4 liquids, again making sure you use the pipette that goes with that liquid. Below shows all of the wells in the spot plate containing a few drops from the cup on their row. |
|
 |
Now you can draw up some of the red cabbage extract from its test tube and place a drop or two in each of the wells that are in the column marked "Red Cabbage". See the below image. |
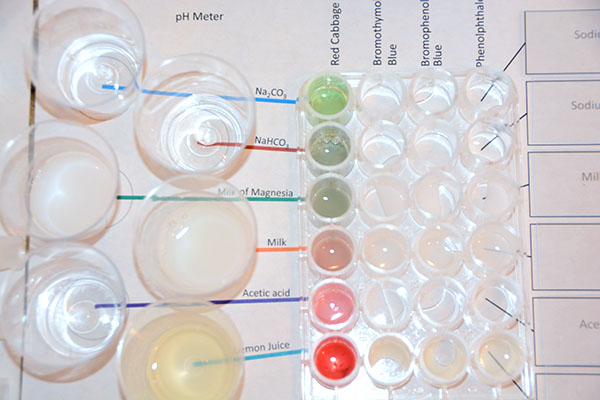 |
Here you can see the first column is titled "Red Cabbage". A drop or two of the red cabbage extract has been added to each of the wells in the left column. The color will be an indicator of the pH of each of the samples. Write the color in the data table. Also, using the chart below, estimate the pH.
|
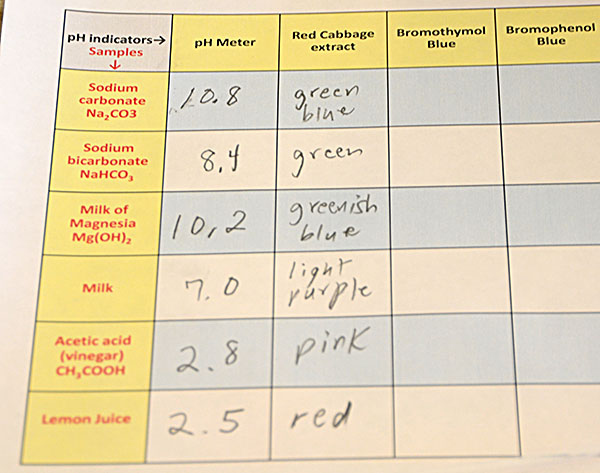 |
These are the colors that were recorded that described the color the samples turned to when the red cabbage extract was affected by the pH of each sample. This also shows the estimated pH that the color represents. |
 |
Bromothymol Blue:
Now you will do the same procedure with each of these liquid pH indicators. Bromothymol Blue is the next column. So do it next. Again, one or two drops in each well (spot) is all you need. |
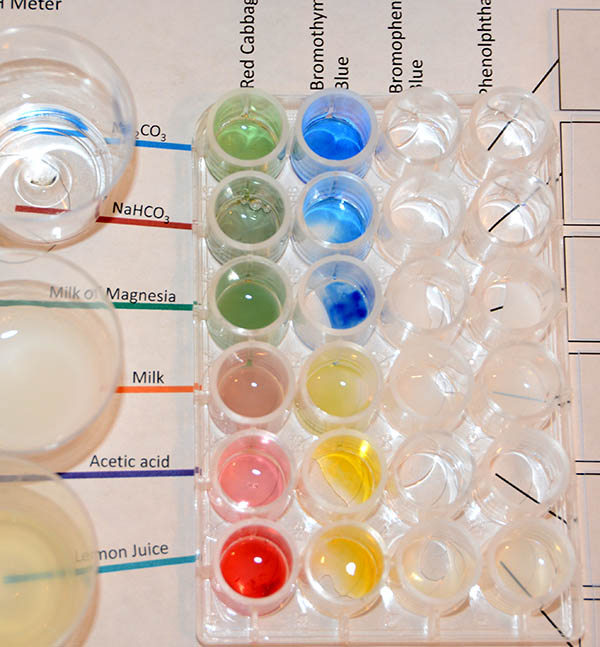 |
These are the colors that the Bromothymol Blue indicator became when affected by the pH of the samples. This type of indicator is used when you only want to know if the pH is staying mostly neutral, such as in aquariums or swimming pools. If the water starts to become acidic, the indicator will be yellow. If the water is becoming alkaline, it will turn blue. So the blue colors of Na2CO3, NaHCO3 and Milk of Magnesia mean those are all above a pH of 7.6, meaning they are all alkaline. Milk is around a pH of 7, so it's color is a pale yellow-green (neither yellow or blue). The acetic acid and lemon juice are definitely yellow and therefore have pH levels below 6.0, which means they are acidic. Again, it doesn't tell you how acidic, just that it is.
|
 |
With bromothymol blue you can tell if the pH is greater (>) than 7.6 or less than (<) 6.0. In between those pH levels, the color is neither blue or yellow but a greenish yellow or greenish blue. |
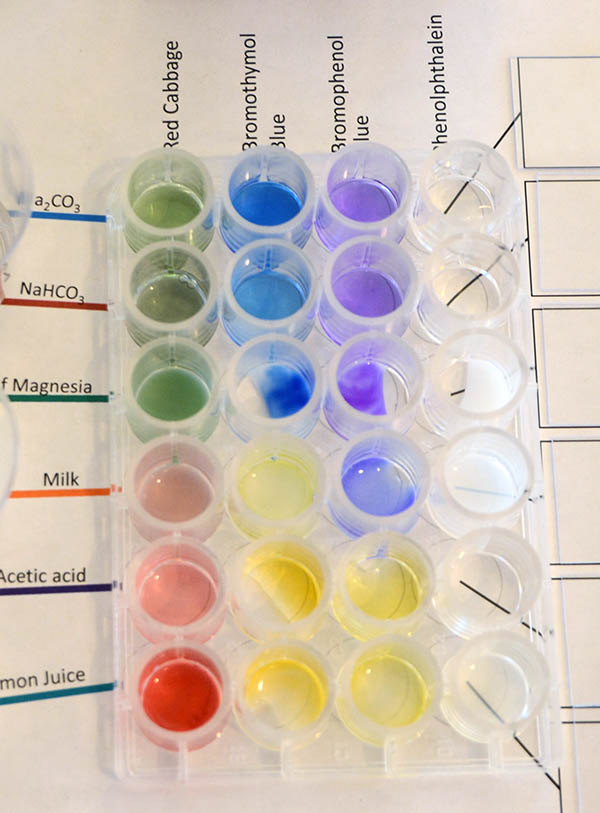 |
Bromophenol Blue: Now use the Bromophenol Blue bottle to add one or two drops to each sample for its column. The image shows what affect the pH of the sample had on the Bromophenol Blue indicator. For this indicator, it becomes yellow if the pH is at 3.0 or below (more strongly acidic). We see that acetic acid and lemon juice are yellow. So those are at or below pH 3.0. The others are all purple or bluish purple. So they are greater or equal to pH 4.6.
Record the color of each sample in the appropriate place on the data table sheet and the pH that its color indicates. |
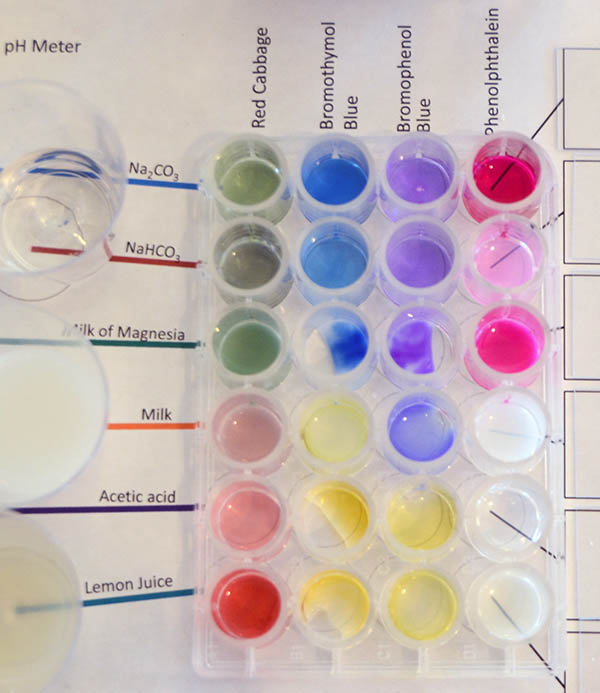 |
Phenolphthalein: The last liquid pH indicator is phenolphthalein. It is clear in neutral or acidic solutions but pink or reddish purple (fuchsia) in alkaline solutions above pH 8.2. Earlier, we found that the solution of NaHCO3 (sodium bicarbonate) had a pH of 8.4 according to the pH meter. That means it is slightly more alkaline than the pH 8.2 that phenolphthalein starts to turn color. That's why it is pink and not a darker purple (fuchsia) like the milk of magnesia and washing soda (Na2CO3). Those had pH levels above 10 (about 100 times more OH- ions than baking soda (NaHCO3/sodium bicarbonate).
Phenolphthalein is good for quantitative analysis of acids because it goes from clear to pink when it crosses from being acidic to being alkaline with only a fraction of a drop of an alkaline solution.
Record the color for each sample in the appropriate box on the data table sheet and the pH that the color indicates. |
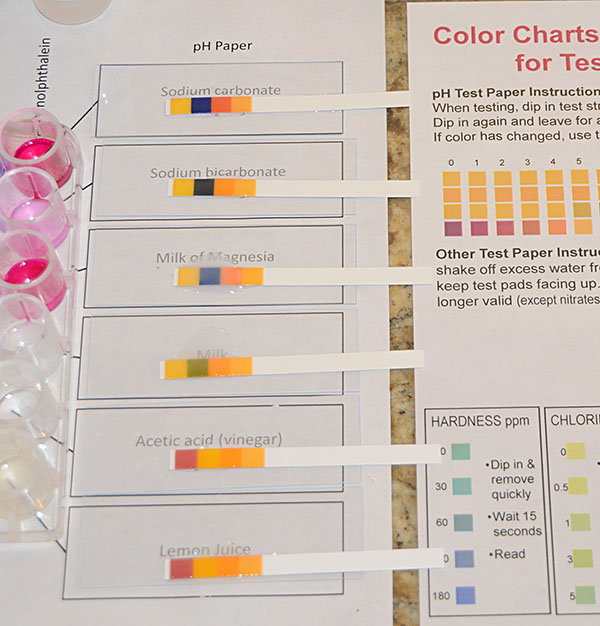 |
Your last measurements of pH will use the Universal pH strips. Lay one alongside the drop on the microscope slide. The solution will soak into the pH strip and the strip will change colors unless it is neutral. |
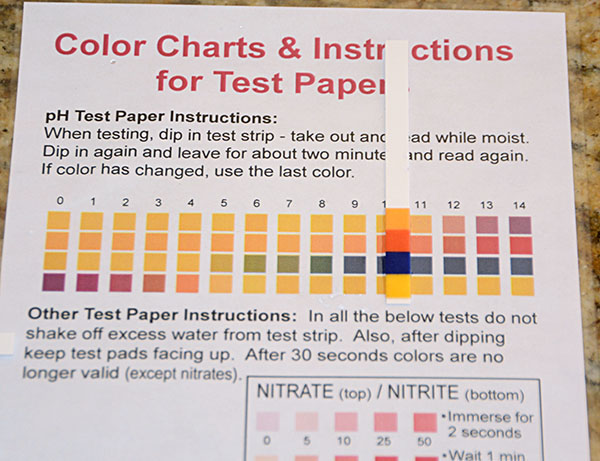 |
Take each strip off of the microscope slide one by one and line it up to the best match on the Color Chart for pH Test Papers. The colors on the wet strip will be look more saturated than the colors on the chart, but use your best judgment to find a match.
Record the pH on the data table sheet. |
|
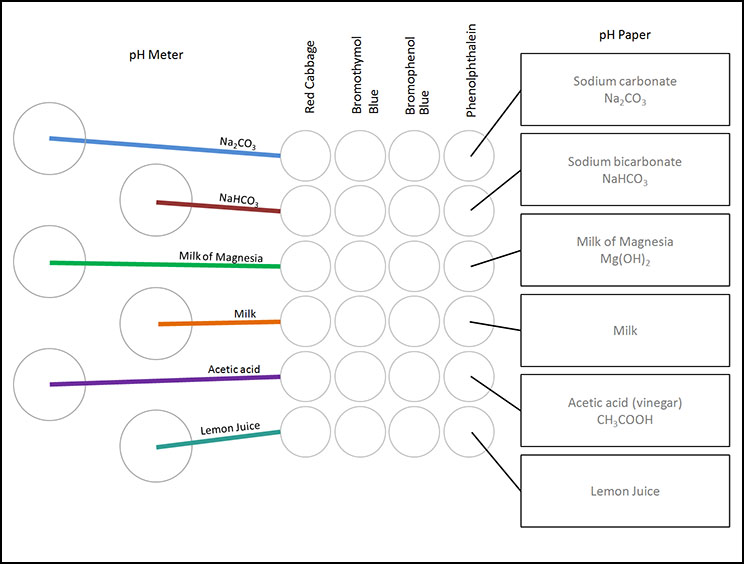
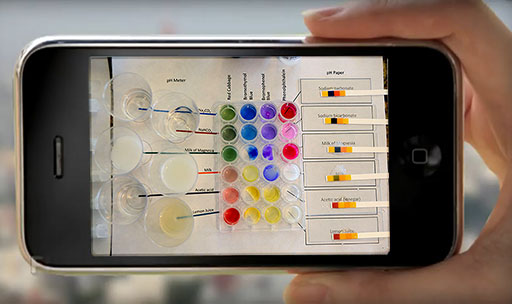
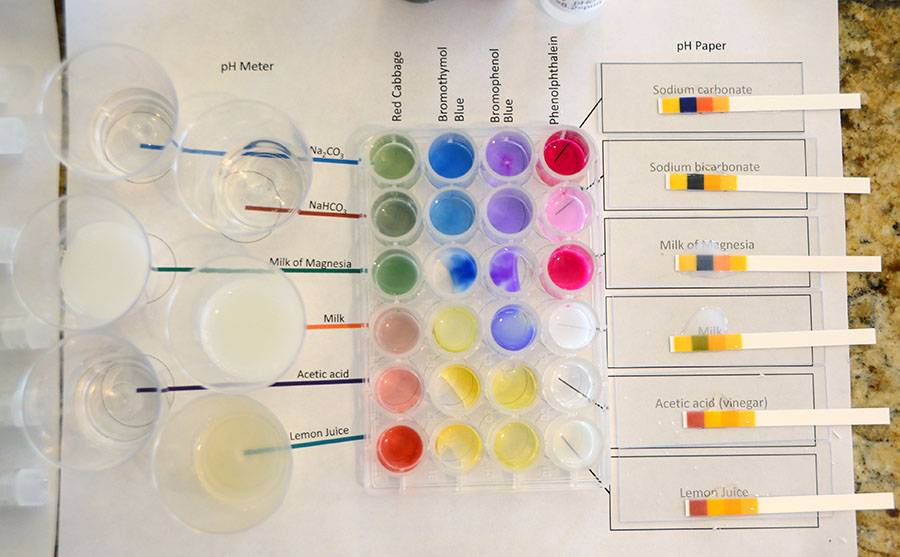
Below is a photo that shows all the colors from the pH indicators and pH paper. Take a photo of your final results. |
|
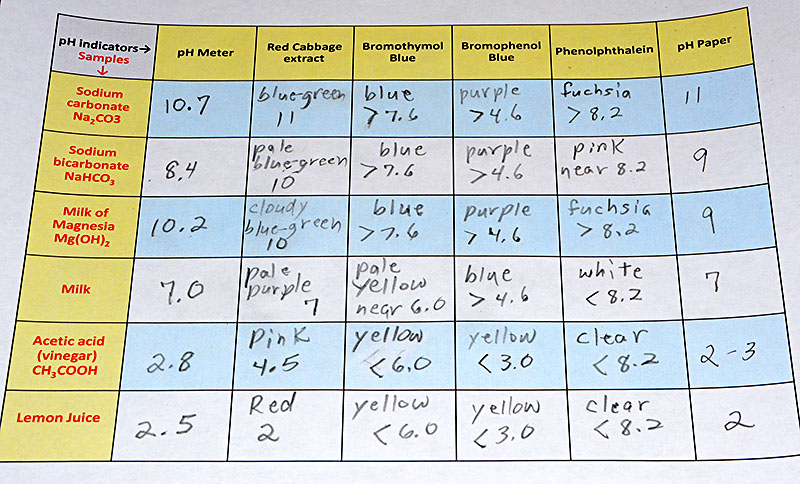
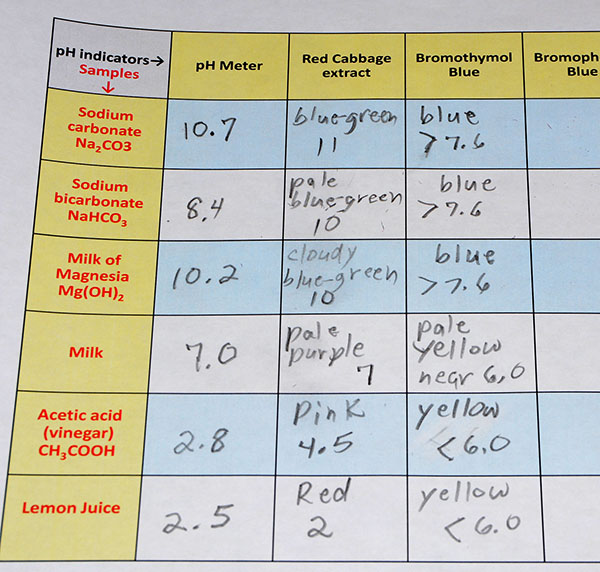
| Below is the data table sheet that was filled out with the observed colors and pH levels. Take a photo of your data sheet. |
|
Clean up: To clean up just pour the liquids in the cups down the drain and rinse off the cups. The spot plate can be washed out as well with warm water and possibly soap (if you wish). Do a final rinse of the spot plate with distilled (purified) water. The pH strips can be thrown in the trash. Rinse off the microscope slides with tap water and then some distilled water. Let air dry or dry with paper towel.
|
Summary of Data to Report |
| Your data is shown in the last two photos that you take. The photo of the matrix sheet of the descriptions of the colors and the pH or pH range the colors represent shows the data that you wrote down. The photo of the colors of the pH indicators and pH strips gives your instructor the data about samples you tested. So there is no written data to submit. Again, the data is all in those two photos. |
Identify a buffer solution (coming in Summer 2015) |
| |
pH and Carbon Dioxide from Breath (coming in Summer 2015) |