1. Describe the characteristics of ionic and covalent compounds, and compare some of their physical and chemical properties.
2. Perform a clean up of raw biodiesel
To understand ionic and covalent compounds, it is best to start with ionic bonds and covalent bonds. Let's first begin with ionic bonds.
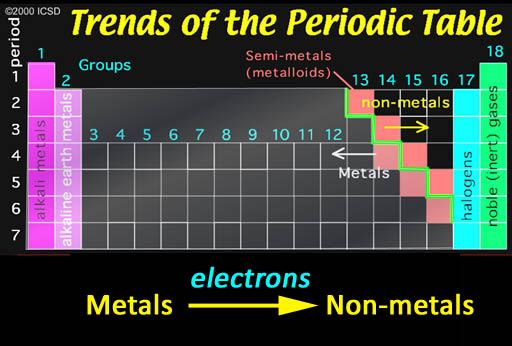
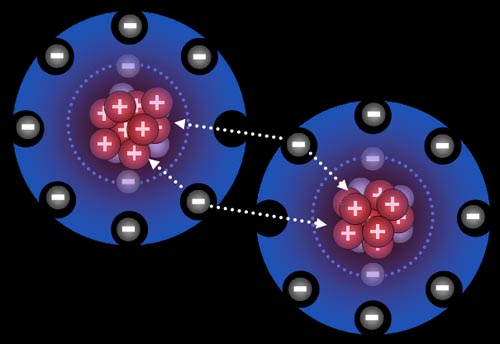
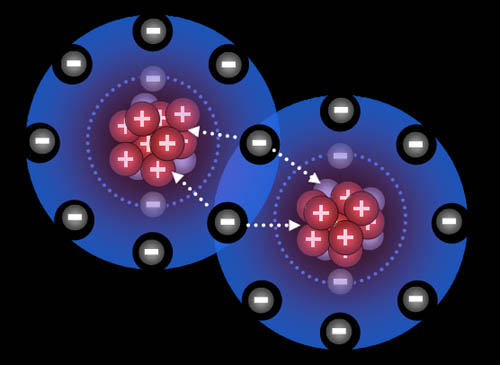
Ionic Bonding: Who bonds with whom? The non-metals in the upper right have a strong pull on electrons and, in contrast, metals tend to let go of their electrons easily. So when they get together, you can guess what happens. It's like putting a greedy person together with a generous person. You can guarantee money will leave the generous person and end up owned by the greedy person. The same thing is true about non-metals and metals. In contact with each other, the metals are usually giving away one or more of their electrons to the non-metals. When this happens, the metals become positive ions because they lost one or more the negative electrons. The non-metals become negative ions because they gained electrons. The metal and non-metal will attract each other because they have opposite charges. That's ionic bonding.
The exception are the noble (inert) gases. They already have 8 outer electrons, which is a very stable configuration. So they won't share any electrons and therefore won't bond with other elements.
The halogens (group 17) are one electron short of a stable 8 configuration (called an octet). That makes them the most "greedy" of all elements. In contrast the metals in groups 1 & 2 are the metals that give up their 1 or 2 electrons the easiest.
So when the halogens come in contact with the metals from the first two groups, step back because there's going to be a violent reaction as electrons transfer from these metals to the halogen elements.
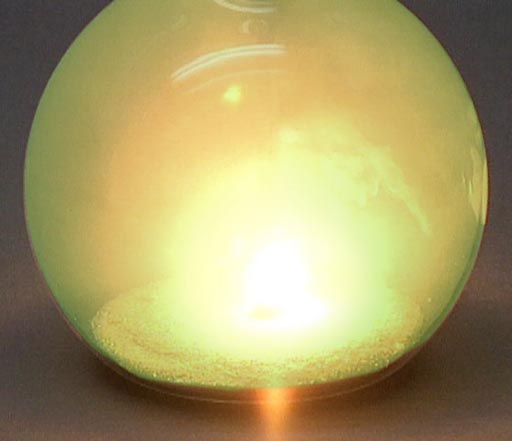
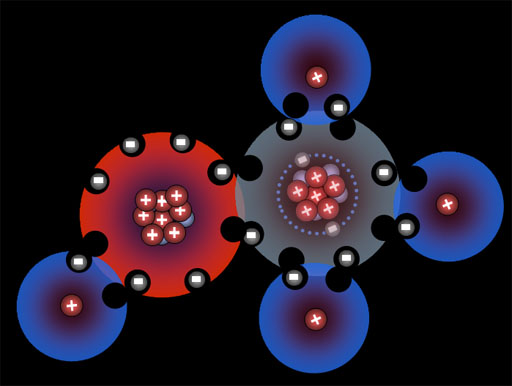
Here chlorine gas is reacting with sodium metal. After all the fireworks, all that's left is NaCl that you can place on your French fries (assuming you have equal numbers of chlorine and sodium atoms present).
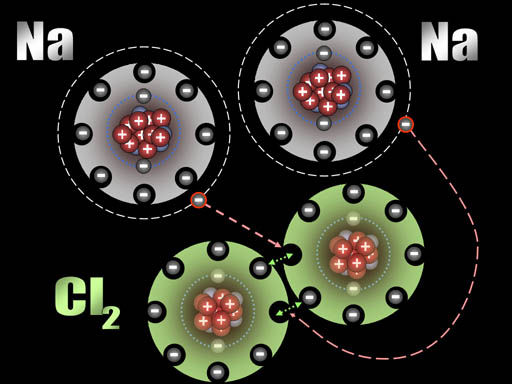
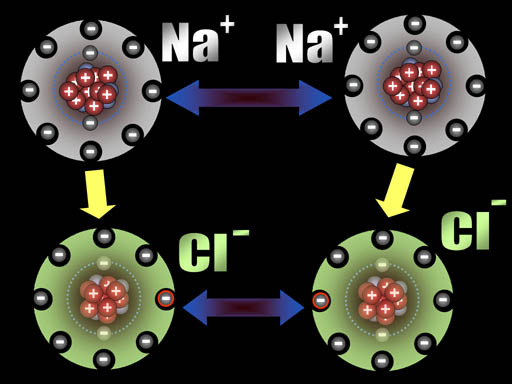
After those two electrons have transferred, the sodium atoms are now positively charged (+1) because the protons in the nucleus out number the electrons in the atom by one. The chlorine atoms are now negatively charged (-1) because each gained an extra electron.
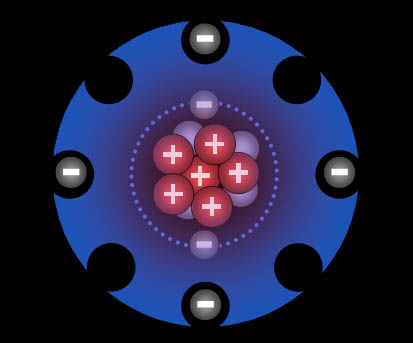
All atoms are now ions because they have a charge. The two sodium ions will push away from each other because they are both positive. The two chloride ions will push away from each other because both are negative. However, since sodium and chlorine are now oppositely charged, they will be attracted to each other. That attraction is a bond appropriately called an ionic bond.
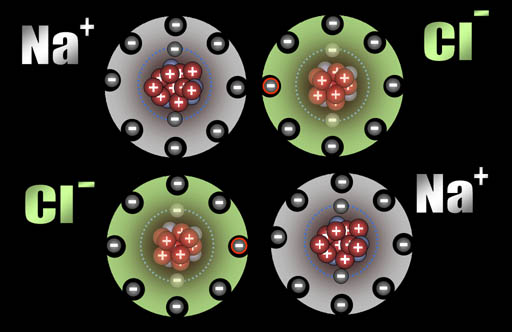
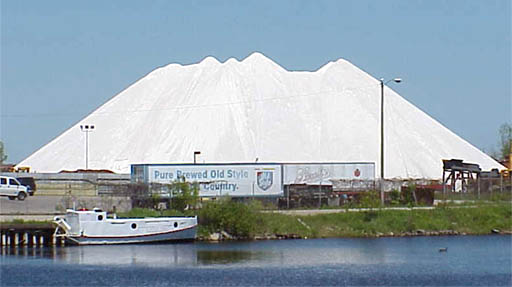
Na+ and Cl- are both very stable because they have the 8 outer electron configuration (octet). That's why our world has trillions of tons of salt (NaCl).
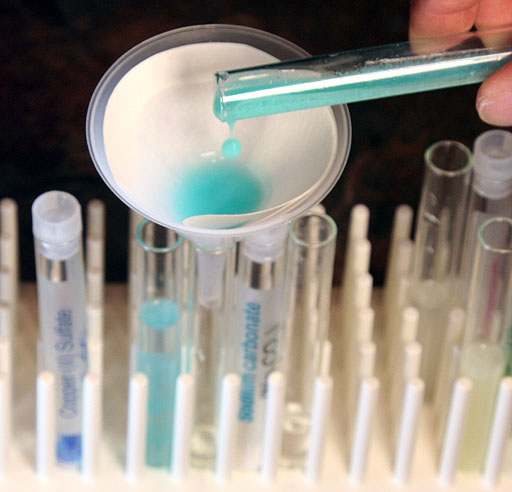
In the last lab about double-replacement reactions. All of the chemicals we worked with were ionic compounds. Most were metals bonded with non-metals. For example, silver chloride, sodium carbonate, copper(II) carbonate, and more. The metals had the positive charge and the non-metals had the negative charge. The bonds were ionic bonds, which made these compounds ionic compounds.
Now let's look at the covalent bond and covalent compounds.

Lewis Dot Structure
vs.
Costello Hole-Punch Structure
Here the fluorine atoms have pulled together and are sharing one electron each. They are now bonded. This is called a single bond (even though two electrons are involved) Because they pull on these shared electrons equally, they call this a covalent bond. "co" meaning "shared" and "valent" meaning "strength". So the strength of the bond is shared equally.
Atoms naturally pull on each other because the protons in them pull on the electrons of the other atoms. However, there has to be room for the electrons to merge and be shared by both atoms, otherwise electron repulsion keeps them apart.
Note: Most non-metal atoms have room for eight outer electrons.
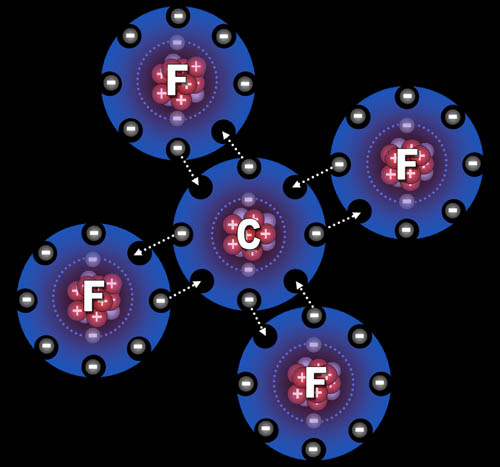
Fluorine "wants" one electron to fill up its outer shell of electrons. Carbon will provide that electron as long as fluorine shares one of its electrons with carbon because carbon also wants to attain 8 outer electrons (8 is called an octet).
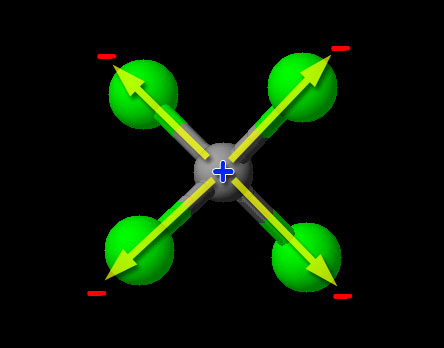
You can see how four fluorine atoms can connect to one carbon atom. They come together to form carbon tetrafluoride, which is a gas used in refrigeration systems. With nine protons, fluorine's pull on that electron is stronger than carbon's pull because carbon only has 6 protons. This uneven sharing of the electrons means fluorine is slightly negative because the electrons are pulled closer to it. Carbon is partially positive because its outer electrons are closer to the fluorine atoms and not canceling out its own positive charge. For this reason, they call this a polar covalent bond. "Covalent" because the electrons are shared and "polar" because there's a + and - charge separation (like the ends of a pole). Roll cursor over the image to see the + and - charged poles.
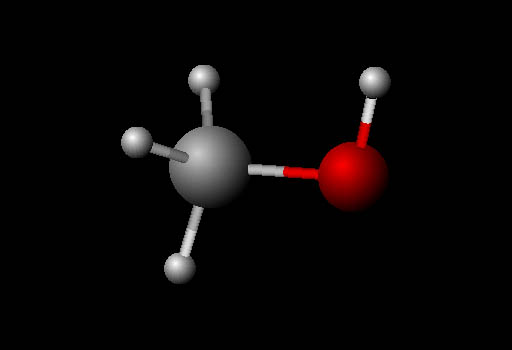
Visualizing Molecules (ball and stick):
The molecule here is also methanol but shown in
the "ball and stick" model format. It's called that because
it shows atoms as balls and the bonds that hold them
together as sticks. The four small white balls are hydrogen atoms.
The large gray ball is carbon. The red ball is oxygen. The balls that
represent the atoms are purposely made smaller so that you can see the
bonds between the atoms. The colors used are arbitrary, not actual colors.
They are standard colors used for models.
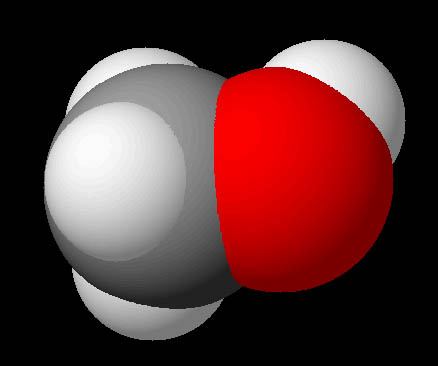
Visualizing Molecules (spacefilled):
Here is the methanol molecule again but using spheres that are more true to the size of the atoms. It is called the "spacefilled" modeling format because the full space of the atoms are being represented. This is good but it hides the electrons being shared (bonds) that connect the atoms.
From the colors and sizes we can assume that we are seeing hydrogen (white), carbon (gray), and oxygen(red) atoms. What we can't see are the positive and negative regions that the molecule may possess.

Visualizing Molecules (Electrostatic map of charges):
In this image the left molecule is methanol
shown in the "ball and stick" model like shown above. The right
image is also methanol but using something like the spacefilled model above
except the colors are indicating regions of positive and negative charges.
This is called an electrostatic map of the molecule. The blue color means a positive region and the red region is a negative
region. The gray is neutral. The gray area is where the carbon and 3 hydrogen
atoms are. The red region is where the oxygen atom is. It is negative
because oxygen has a strong pull on electrons around it. The blue region
is where the single hydrogen atom is. It is positive because the oxygen
atom has pulled the hydrogen's electron away from it exposing the proton
which is in the center of hydrogen.
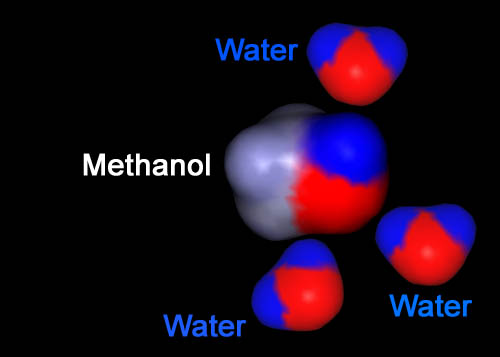
Just like the opposite poles of a magnet (north and south) attract, so does opposite charges (plus and minus). It is the opposite charges that causes molecules to be attracted to another. Here we see the negative (red) side of the top water being attracted to the positive (blue) region on the methanol. The bottom 2 waters have their positive (blue) sides attracted to the negative (red) part of methanol. This is why water dissolves (mixes with) alcohol.

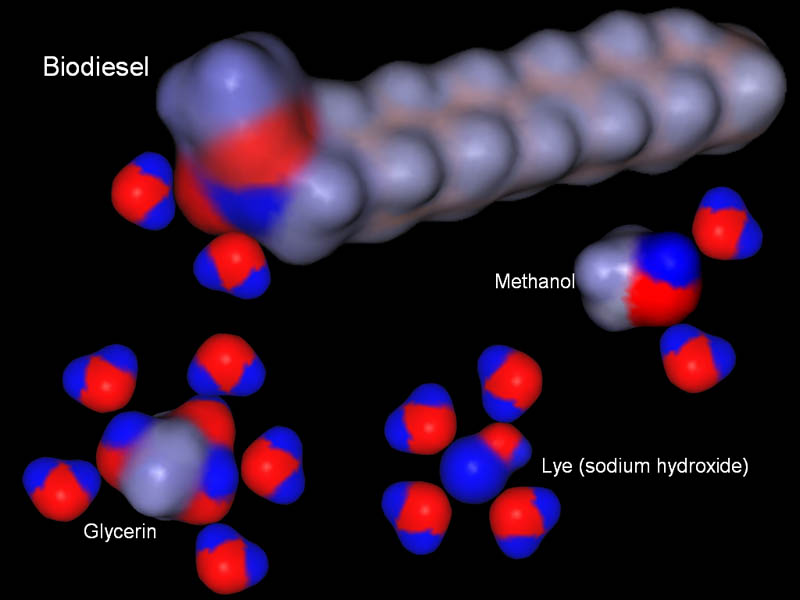
Biodiesel Mostly Neutral:
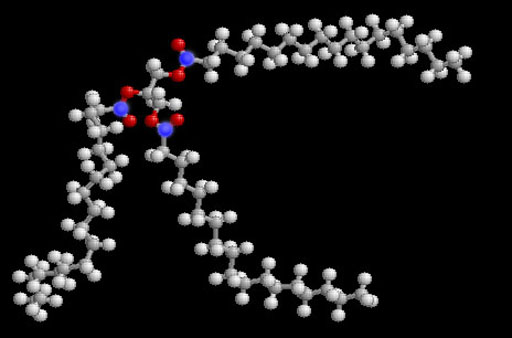
The end of the biodiesel that has the two oxygen atoms does have two negative (red) regions and one positive (blue) region; however, the majority of the biodiesel molecule is neutral (gray). That's why biodiesel does not dissolve in water.
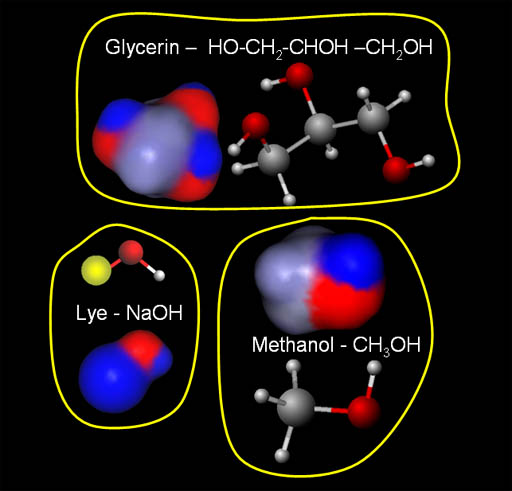
Contaminants in Biodiesel:
The molecules in the image are three of the main contaminants in the biodiesel. They are glycerin, sodium hydroxide (lye), and methanol. The good news is that each of them have negative and positive regions. That means water will be attracted to them and hold onto them. In other words, when the biodiesel is mixed with water, these contaminants will stay with the water when the water separates from the biodiesel.
Melting Points and Solubility of Ionic, Polar, and Non-Polar Covalent substances
Substance |
Formula |
Classification (ionic, polar, nonpolar covalent) |
Solubility in Water |
Melting Point |
| sodium chloride | NaCl | ionic | Soluble | 801°C (1474°F) |
| iron(II) sulfate | FeSO4 | ionic | Soluble | 400°C (752°F)(decomposes as it melts) |
| sucrose (sugar) | C12H22O11 | polar (also called polar covalent) | Soluble | 186°C (366°F) (decomposes as it melts) |
| dodecane | C12H26 | nonpolar covalent | Insoluble | -9.6 °C (15 °F) |
| propane | C3H8 | nonpolar covalent | Insoluble | -188°C (-306°F) |
Below are compounds involved in biodiesel production |
||||
| glycerin | C3H8O3 | polar (also called polar covalent) | Soluble | 17.8°C (64.0°F) |
| sodium hydroxide | NaOH | ionic | Soluble | 318 °C (604 °F) |
| methanol | CH3OH | polar | Soluble | −98°C (-144°F) |
| water | H2O | polar | Soluble | 0°C (32 °F) |
| biodiesel | C15-20H28-38O2 | nonpolar covalent | Insoluble | ~0°C (32 °F) gel point |
| magnesium silicate | Mg3Si4O10(OH)2 | ionic | Insoluble | 800°C (1472°F) |
What we learn from the above table is the following:
Ionic compounds have higher melting points. This implies that the bonds between ionic compounds are quite strong and require high temperatures to break them.
Ionic and polar compounds are usually soluble in water. This is because water's partial charges are attracted to the charges in ionic compounds and the partial charges of polar compounds. Some ionic and polar compounds will not dissolve in water if they are large compounds or the bonds are too strong for water to pull apart. Recall all of these precipitates in the previous lab did not dissolve in water even though they were ionic compounds.
Polar compounds have much higher melting points than non-polar covalent compounds of the same size. For example, sucrose and dodecane both have 12 carbons, but sucrose melts at 366°F and dodecane melts at a cold 15°F. Glycerin and propane have 3 carbon atoms each. However, glycerin melts at 64°C, but propane melts at the extreme cold temperature of -306°F. The OH groups on sucrose and glycerin allow for hydrogen bonding between the hydrogen atoms on one molecule and the oxygen atoms on the other molecule. This extra attraction requires higher temperature to overcome.
Non-polar compounds are not soluble in water.
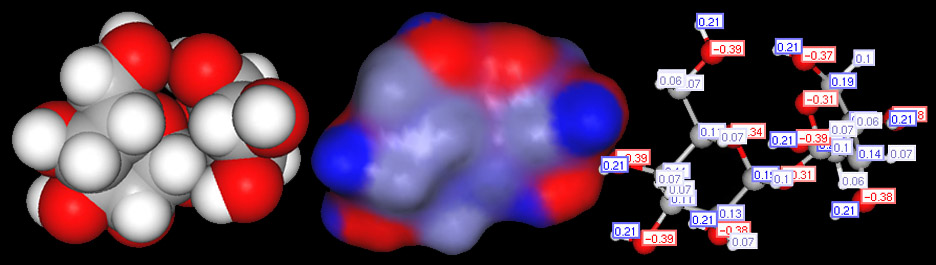
Earlier we examined the charges in methanol. Below we will look at the charges of a another polar covalent compound, sucrose.

Classifying compounds as ionic, polar or nonpolar covalent.
Now look at just the blocks of the non-metals. When they combine, they electrons are shared and no ions are formed. So that's a covalent bond. If elements that have the same or similar electronegativities combine, the bond is called non-polar because the electrons are evenly shared and no + and - poles are present. However, if the two non-metals have significantly different electronegativities, then one will pull on the shared electrons more than the other, so there will be some partial positive and partial negative atoms. That makes the bond polar (also called polar covalent)
CCl4 _____________________
Since this is a non-metal combining with non-metal, we have covalent bonding (sharing of electrons). To determine if it is polar or nonpolar, we look at the relative pulling power on electrons (electronegativity) of the atoms. We can try to find carbon and chlorine on the 3d image above, but that's a bit hard. Looking up the electronegativity of chlorine we find the value of "3.16". Carbon's electronegativity is 2.55. If the difference is greater than 0.4 and less than 1.7, then it's usually considered a polar covalent bond. (A difference less than 0.4 is nonpolar.) Since the difference of 3.16-2.55=0.61, it falls in the range of being polar covalent bond. So the carbon-chlorine bonds are polar covalent (also called polar), with the chlorine atoms being partially negative and the carbon being partially positive. Normally that makes the compound itself a polar covalent compound; however, CCl4 is special because the four chlorines are evenly spaced around the carbon and their polar charges cancel. Notice the +/- poles of the two top chlorine atoms cancel the +/- poles of the bottom two chlorine atoms. So the bonds are polar covalent but the compound is nonpolar covalent.
NaNO3 ___________________
This is a metal (sodium) bonded to a group of non-metals (NO3). So that says ionic compound. When you see NO3 bonded with a metal, you should recognize it as the nitrate (NO3-) ion.
NH4Cl___________________
Even though these are all non-metals, which normally says, "covalent bonds", this is the one case where some of the bonds are ionic. NH3 is ammonia, which has covalent bonds, but a hydrogen ion (H+) is attracted to the nitrogen, turning NH3 into NH4+ ion. The "Cl" here is the chloride ion "Cl-". So the NH4+ ion is attracted to the Cl- ion making an ionic bond and an ionic compound.
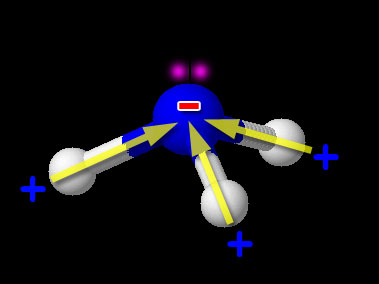
Here we have one non-metal (N) bonded to another non-metal (H). So this is the usual covalent bond. Now we need to see if it is polar or non-polar. We look up the electronegativity of nitrogen and hydrogen. Nitrogen is 3.04 and hydrogen is 2.20. The difference is 3.04-2.20=0.84. This falls in the range of polar covalent bond (between 0.4 and 1.7). Compounds with polar covalent bonds usually make the compound a polar covalent compound unless the polar charges cancel like they did with CCl4. CCl4 was symmetric but NH3 isn't. The image shows NH3 (ammonia). Notice the 3 hydrogen atoms and the +/- poles are all pointing in same direction. So overall the hydrogen end of NH3 is positive and the nitrogen end is negative. So this compound is polar covalent. Regarding the shape of NH3, it's because nitrogen has 5 outer electrons. Three are being shared with the 3 hydrogen atoms. Two unshared electrons on the top push the hydrogen atoms downward.
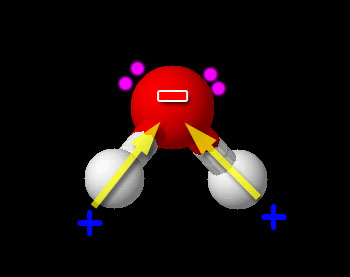
Here we have one non-metal (H) bonded to another non-metal (O). So this is a typical covalent bond. Now we need to see if it is polar or non-polar. We look up the electronegativity of oxygen and hydrogen. Oxygen is 3.44 and hydrogen is 2.20. The difference is 3.44-2.20=1.24. This falls in the range of polar covalent bond (between 0.4 and 1.7). Compounds with polar covalent bonds usually make the compound a polar covalent compound unless the polar charges cancel like they did with CCl4. Water is a bent molecule. The hydrogen atoms and the +/- poles are on the same side, so the poles are reinforced. This makes water very polar. So it is a polar covalent compound. The hydrogen atoms are pushed to one side because there are two pairs of unshared electrons on the other end of the oxygen atom. Oxygen has 6 outer electrons. Two are shared with the two hydrogen atoms. The remaining 4 are the two pairs of unshared electrons.
Before you dive in and learn how to cleanup raw biodiesel so that is is ready to go into a diesel engine, you should read how small amounts of biodiesel can be made. So read the
tutorial at the below link. It should only take about 10 minutes. Here is the URL:
SmallScaleBiodiesel.htm

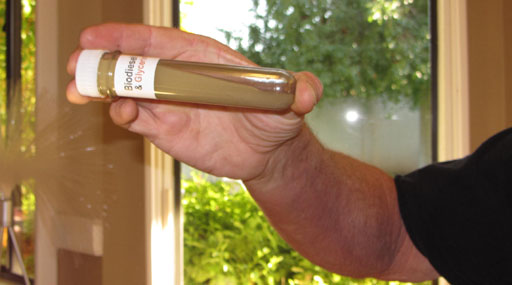
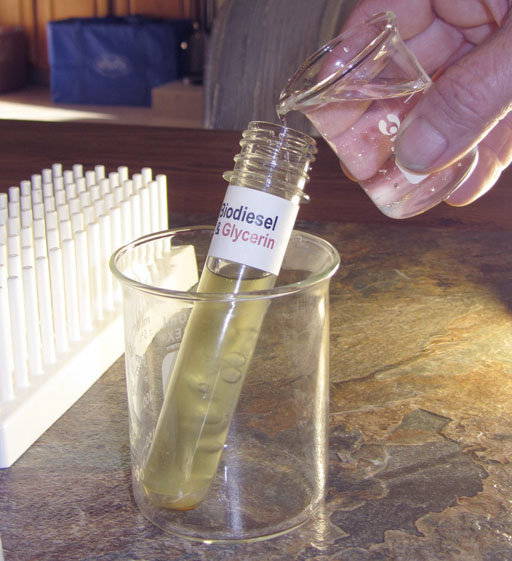
On the back panel of the kit is the large test tube that is storing the raw biodiesel. You see two layers. The top layer is the mostly biodiesel, and the bottom layer is mostly glycerin. The contaminants of methanol and sodium hydroxide are in both layers. Below explains why methanol and sodium hydroxide is present.
Vegetable oil or animal fat is turned into biodiesel by first creating an aggressive form of methanol called methoxide by mixing methanol with sodium hydroxide.
NaOH + CH3OH --> Na+ + CH3O- + HOH
Vegetable oil and animal fat is made up of molecules that have 3 fatty acids connected to a glycerin molecule. They are called triglycerides because there are 3 fatty acids attached to a glycerin molecule.

The negative methoxide ion (CH3O-) attacks the partially positive carbon atoms (blue atoms). These carbon atoms sit between two oxygen atoms that are pulling their electrons away from them. That's makes the carbon atoms partially positive, and it also makes them the target for the negative CH3O- ion. Remember, opposite ions attract.

After the methoxide ion attacks, it splits up the triglyceride into glycerin (on the left) and 3 separate biodiesel molecules.
When this reaction occurs, sodium hydroxide is reformed. So it doesn't get consumed, which is why it is still in the raw biodiesel. Also, to get higher levels of methoxide, excess methanol is used. So that's why extra methanol is in the raw biodiesel. Your job will be to remove the methanol and sodium hydroxide from the biodiesel layer.
The biodiesel layer also has some glycerin in it. Not all will settle to the bottom. So that makes three contaminants that need to be removed from the biodiesel.
Glycerin and methanol are polar covalent compounds, and sodium hydroxide is an ionic compound. These are all soluble in water. So that means water will be our strategy for cleaning up the biodiesel.

The progress of our cleaning will be indicated by the pH. Remember sodium hydroxide (NaOH) is very alkaline because it releases OH- ions. High OH- levels give high pH levels (above pH 7). If we get rid of sodium hydroxide, then the pH will drop down closer to the neutral pH of 7. Since water dissolves sodium hydroxide and the other contaminants, we can assume all contaminants are gone when the pH is close to 7.
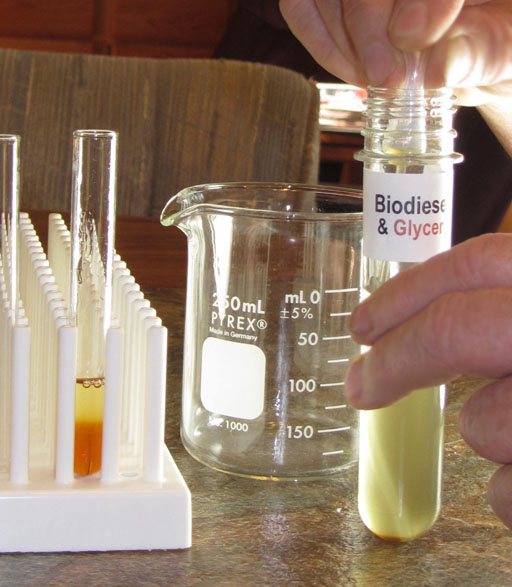
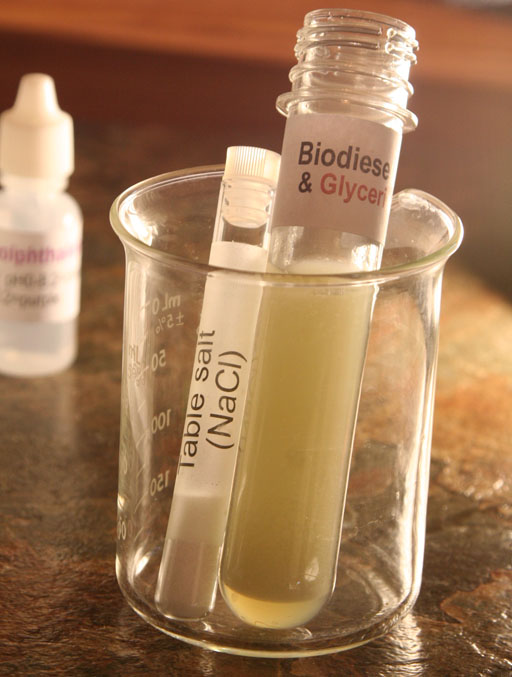
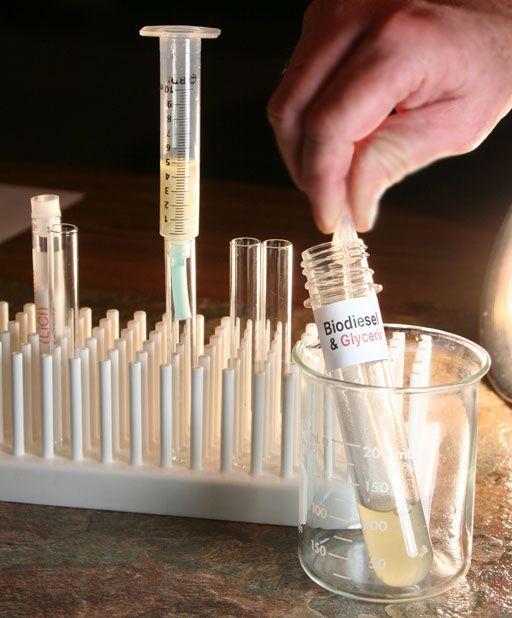
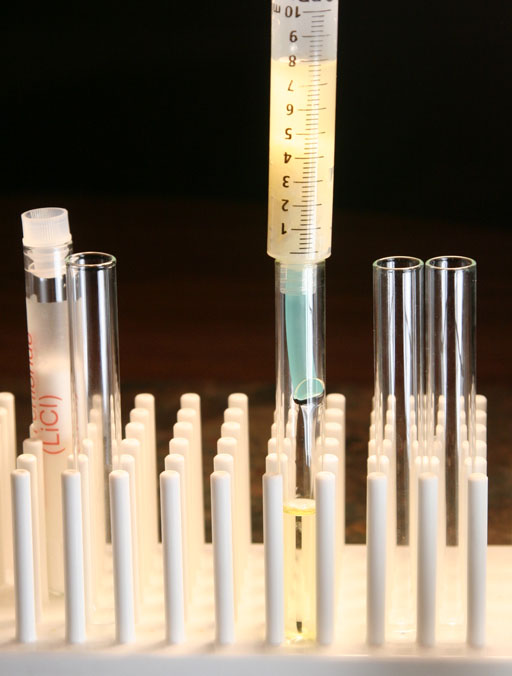
Let's first test the pH of the glycerin and biodiesel layers. Place a small amount of the biodiesel in a test tube (left test tube). And place a small amount of glycerin in another test tube (middle test tube).
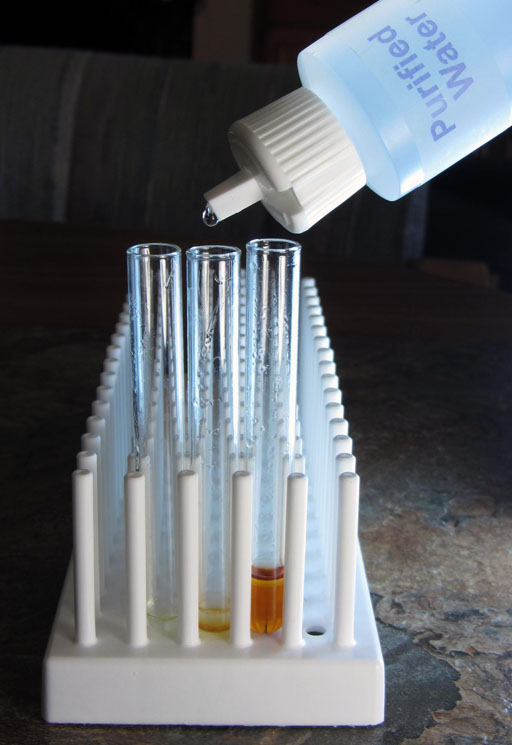
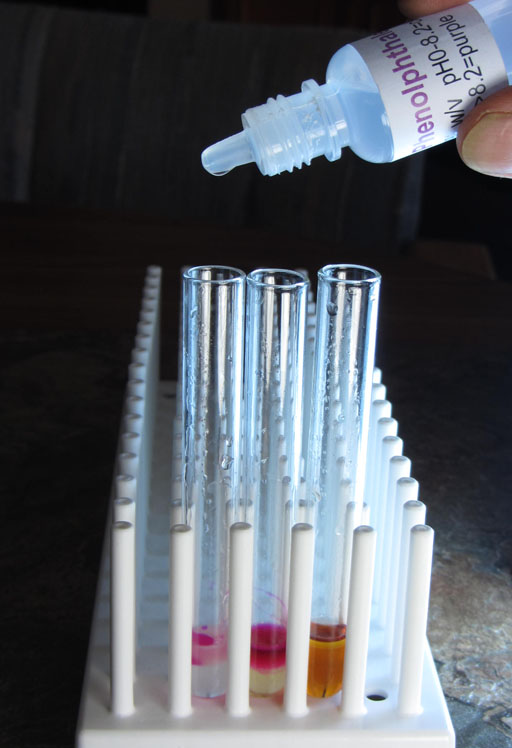
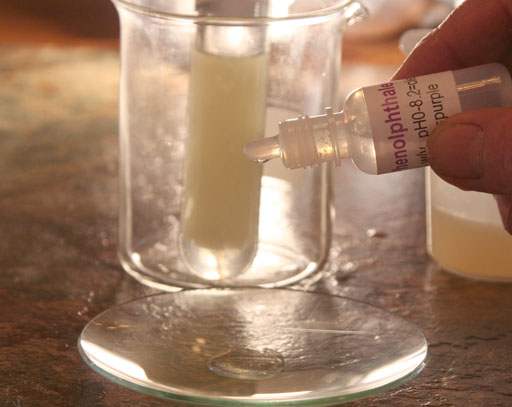
To show us that there is sodium hydroxide in both the biodiesel layer and the glycerin layer, we will place a drop of phenolphthalein in each of the two test tubes (left and middle ones).
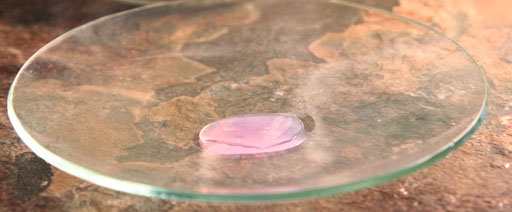
Phenolphthalein turns pinkish at pH 8.2. As the pH goes higher then 8.2 the color is more purple. The dark purple that we see in these test tubes indicates that the pH is quite a bit higher than pH 8.2.
Take a photo of the two test tubes that had phenolphthalein added.
a1) Is pH 8.2 alkaline or acidic?
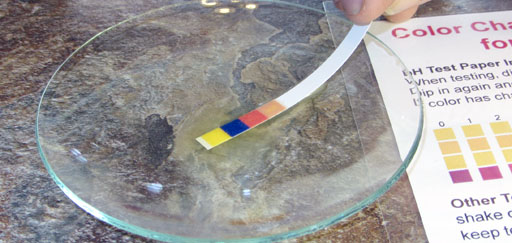
You don't need to do this, but we took some glycerin, added a little water, then used the pH test strip to test its pH.
Being purple, the phenolphthalein indicated that the glycerin and biodiesel had a pH above 8.2. The pH paper will give us a more accurate reading.
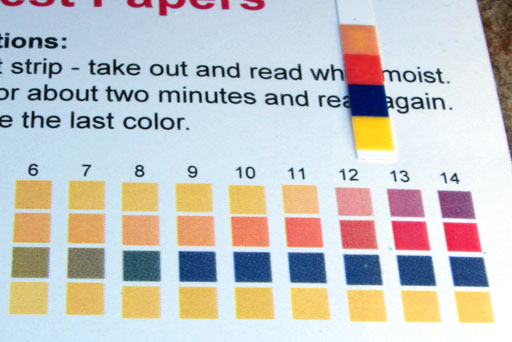
Comparing the pH strip with the color chart, we see that the pH is around 12. The red square of the strip looks like 13, but the top square of the strip looks like between 11 and 12. So that averages around 12. That agrees with the dark purple color of the phenolphthalein which indicated the pH was higher than the 8.2 minimum level of phenolphthalein have a color. It is clear if below pH 8.2.
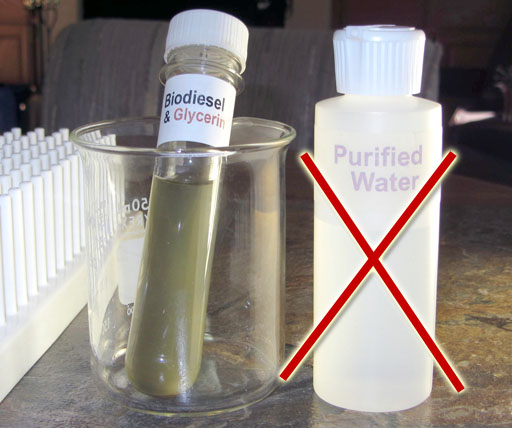
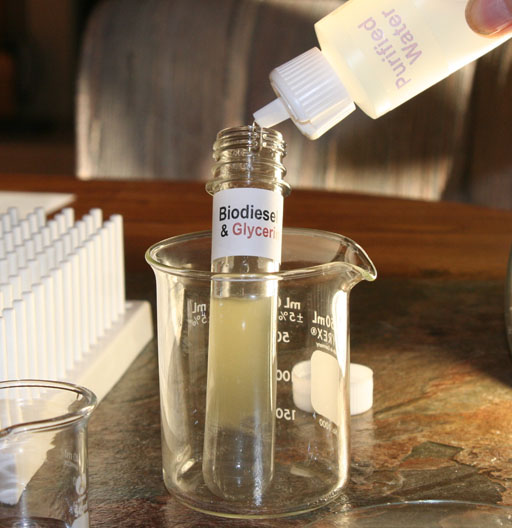
We are going to use water to wash out the contaminants from the biodiesel. You might think that purified water would work best for washing the biodiesel, but experience has found that purified water is much more apt to create an emulsion that will not separate into water and biodiesel. We found that tap water works best. This is one place where the hard water in the valley is actually good for something.
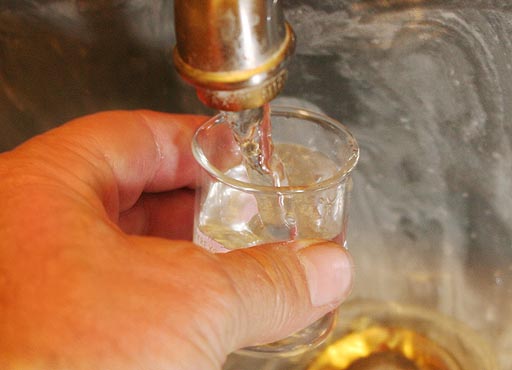
Fill the 50 mL beaker with tap water. You will use that to wash the biodiesel.
Even if you have a water softener at your home, the sodium that is put into the water from the water softener still helps in keeping the biodiesel from turning into an emulsion.
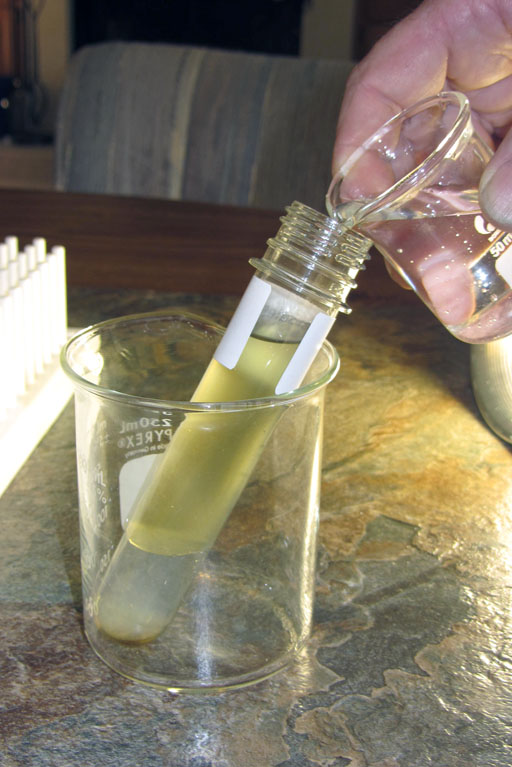
Pour the tap water into the large test tube with the biodiesel. Fill it to the top of the white label.
a2) The water sinks to the bottom. Which has the higher density, biodiesel or water?
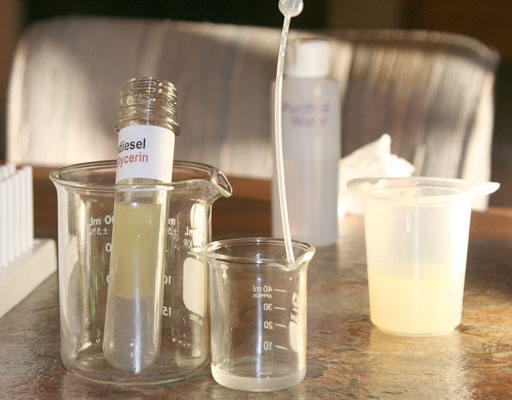
Rock the test tube with the water and biodiesel back and forth several times (for about a minute). If you shake it, it might form an emulsion which doesn't want to separate. So avoid vigorous shaking at this point.
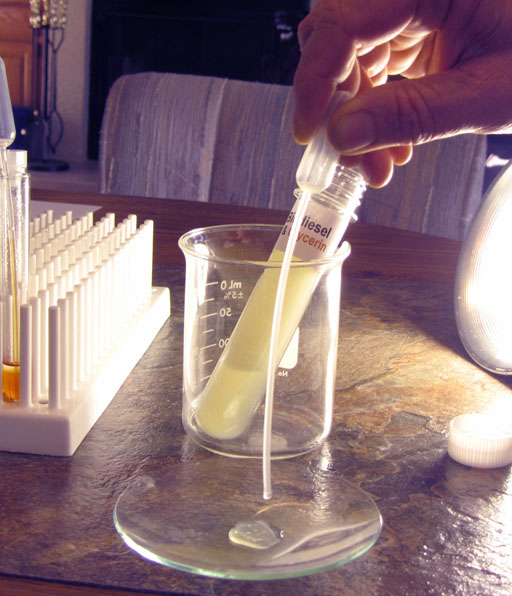
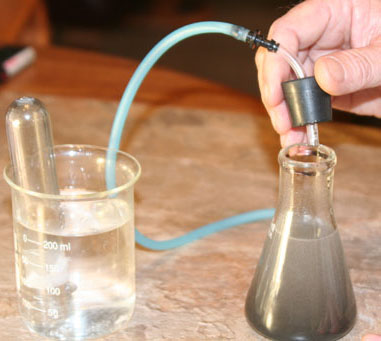
After the water separates from the biodiesel, use a disposal pipette to transfer a little of the wash water to the watch glass.

Use the same disposable pipette that you used to get some wash water into the watch glass to transfer all of the wash water to the 100 mL plastic beaker.
We apologize that this wash water in the plastic beaker looks like an urine sample, but that's unavoidable.
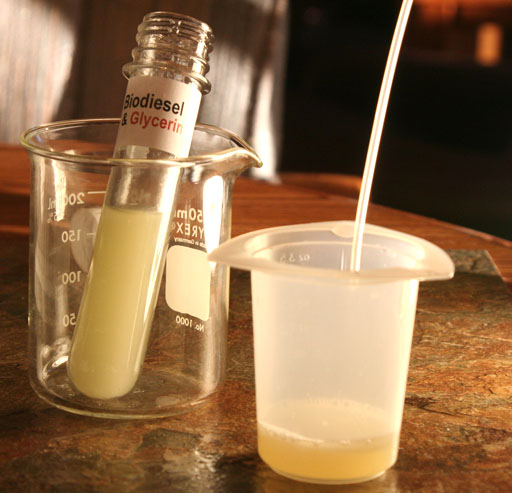
The plastic beaker is where you will dispose of the wash water after each washing.
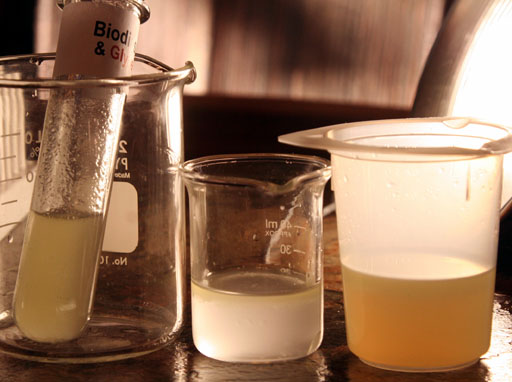
Add more tap water to the biodiesel. It will take 3 or 4 washings to remove the contaminants.
After the first wash, you can rock the test tube more vigorously.
Like before, after the water separates, transfer the wash water to the 100 mL plastic beaker.
On the third wash, shake the test tube rather than just rocking it back and forth. As you get rid of the more methanol from the biodiesel, it is less likely to form an emulsion.
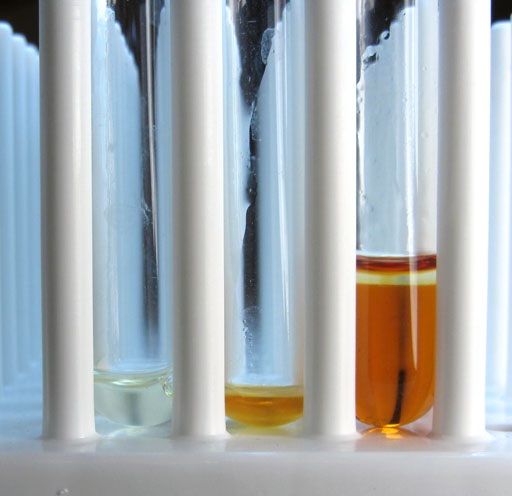
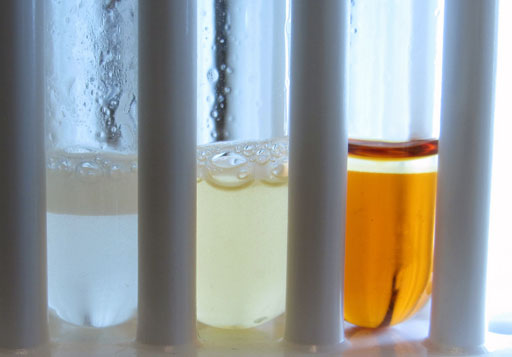
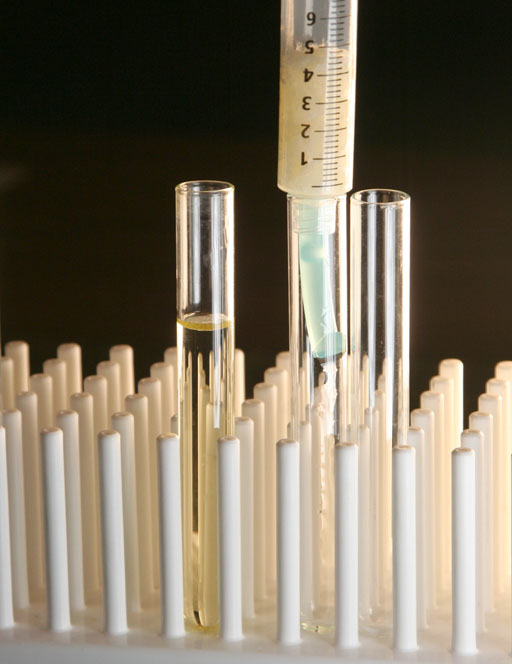
On our third wash we got a pink color. That means the pH has gone down close to the pH of 8.2. That means there is less sodium hydroxide in the wash water because much of it has been washed away. We can also assume that there is now less methanol and glycerin in the biodiesel.
a3) What color do you see in your third wash water?
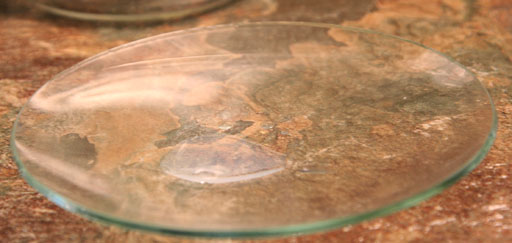
We gave the biodiesel another wash and tested that wash water with phenolphthalein. This time it was clear. That means the pH is dropped below 8.2, and closer to pH 7. That means all or nearly all of the sodium hydroxide has been removed from the biodiesel. We can also assume that methanol and glycerin has been also removed.
a4) What color do you see in your fourth wash water?
In the process of using tap water to wash the biodiesel, we have removed all or most of sodium hydroxide, methanol, and glycerin that were involved with the reaction that made the biodiesel. Unfortunately, tap water has a lot of salts in it. Remember the high TDS values of our tap water. So now we can wash out those salts using purified water.
With methanol gone, purified water will not likely make an emulsion.
Pour out the tap water from the 50 mL beaker and dry out the beaker with a paper towel.
Do two washings with purified water, and transfer those washings to the 50 mL beaker that you just emptied. Remember, you can shake the water and biodiesel fairly vigorously at this point.
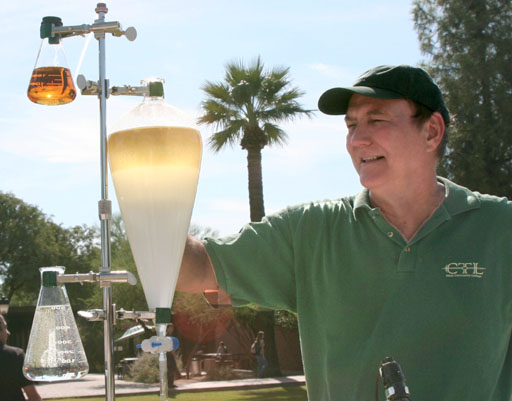
Take a photo of yourself shaking the large test tube with the biodiesel in it.
You may have noticed that the biodiesel layer seems quite a bit less than what you started with. One reason is that the "biodiesel" layer contained about 15% methanol. So some of that volume was only methanol which is now dissolved in the water. Also, you may notice there is a layer of biodiesel in both the tap water and purified water washings. Those biodiesel layers could be pulled off of the top and placed back into the large test tube with the washed biodiesel. However, that would add unclean biodiesel to clean biodiesel.
To avoid loss of biodiesel, the home brewers will let the biodiesel sit overnight after washing. That guarantees most of it separates so that when they drain off the water, there's almost no biodiesel in the water. Fuel companies that make biodiesel use powerful centrifuges to cause separation to happen in a second or two.
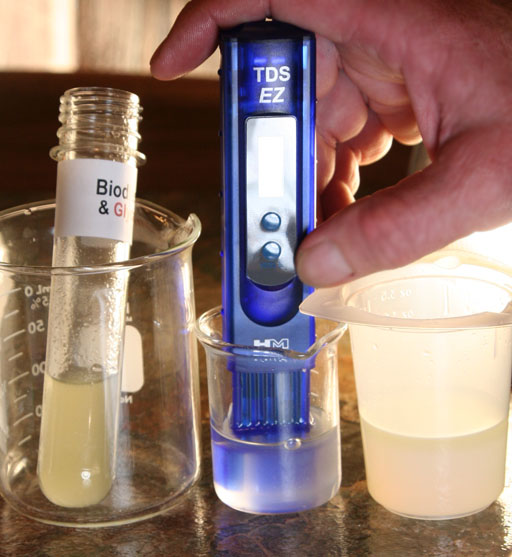
Since we had used purified water to wash out the dissolved salts that came from the tap water, we wanted to use the TDS meter to measure the concentration of dissolved salts (solids) in the purified water wash water.
The meter only read a level of 2 mg/L. We knew it had to be more than that. We then realized that the biodiesel that was floating on top of the wash water must have coated the metal probes at the bottom of the TDS meter. Remember, the TDS meter works by measuring the conductance of the solution. The oily biodiesel acts like an insulator, which prevented any electrical current from passing through it. So it read out a very low TDS level. So that didn't work.
We would have to remove the biodiesel from the wash water thoroughly before we could use the TDS meter properly.
There's no need for you to try to use the TDS meter. We had to clean the metal probes at the bottom of our TDS meter with Fantastic before we could get it working properly again.
Let's assume the purified water has removed the salts that the tap water had introduced to the biodiesel. There's just one more contaminant that has to be removed from the biodiesel, and that is water itself.
To remove water, we need something that is like water. Water is a polar compound. So we either need another polar compound or an ionic compound. Those will have charges that will attract water. We also have to choose one that will not dissolve into biodiesel nor dissolve too much into the water.
"Desiccants" are anything that absorb water.
Here are some candidates:
Anhydrous salts (anhydrous means no water): These are salts that normally have water molecules bonded to them, but the water has been driven off so they are called "anhydrous" ("an" means "no" and "hydrous" means "water"). These readily bond to water. Examples are anhydrous calcium sulfate, anhydrous copper(II) sulfate, and anhydrous magnesium sulfate. In the last lab you used copper(II) sulfate pentahydrate (penta=5). The crystals were a bright blue. If heated, the five water molecules bonded to each copper(II) sulfate molecule are driven off and you end up with anhydrous copper(II) sulfate, which is white. If the biodiesel were passed over those white copper(II) sulfate crystals, they would turn blue as they absorbed the water. You kit also has Epsom salts, which are magnesium sulfate heptahydrate (hepta=7). If the Epsom salts were heated, those 7 water molecules would be driven off and you would have anhydrous magnesium sulfate. So that could also absorb water. Again, salts are ionic compounds that have charges that will attract water.
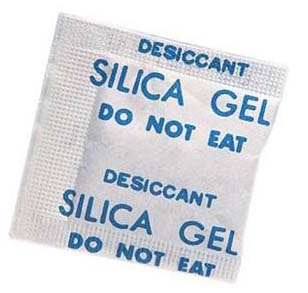
Silica Gel: You probably have found those little white packets in some items that you buy. These are packets usually contain silica gel.
a5) What is silica gel?

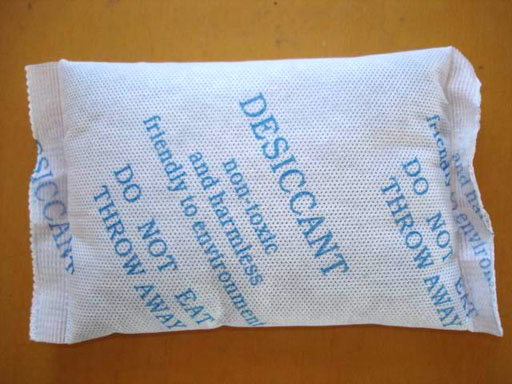
Clays: You may have made pottery or seen people make pottery. They use a clay because it absorbs water and becomes moldable. The image shown earlier and below of the packet that says "Desiccant non-toxic" is made from a clay.

Cellulose
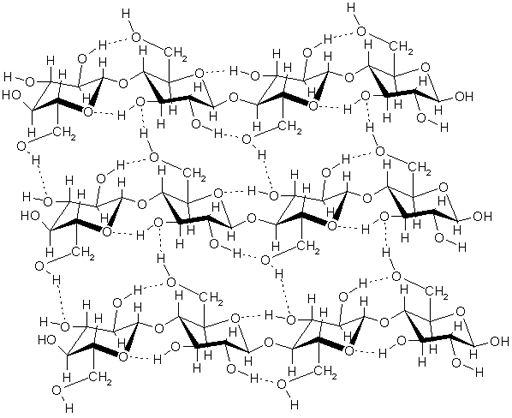
Compounds containing the hydroxyl group (-OH): The OH group is polar because oxygen is more electronegative than hydrogen (electronegativity is a measurement of how strong an element pulls on electrons). This gives oxygen a partial negative charge and hydrogen a partial positive charge. These groups will attract water because water also has those 2 charges. If a compound has one OH group, it's called an alcohol. If it has 2, it's called a glycol such as ethylene glycol (antifreeze). If it is a chain of glycols, it's called polyglycols, which are used for making plastics. Sugars also have several OH groups. Starches are chains of glucose sugar molecules, so that would work. Cellulose is also chains of glucose molecules with hundreds or thousands of glucose molecules which have five OH groups each. The image shows a segment of 3 cellulose chains. The dotted lines are the hydrogen bonding that happens between hydrogen and oxygen. If water were present, it would use hydrogen bonding to bind to the OH groups in the cellulose.
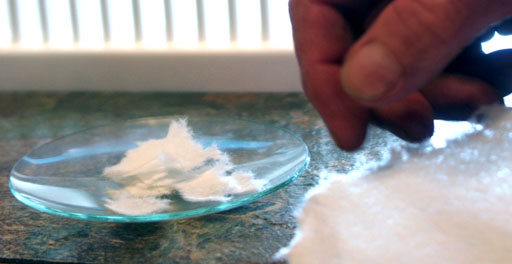
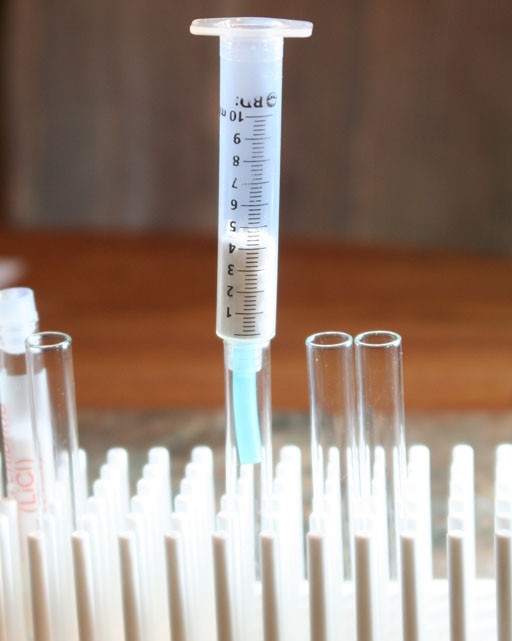
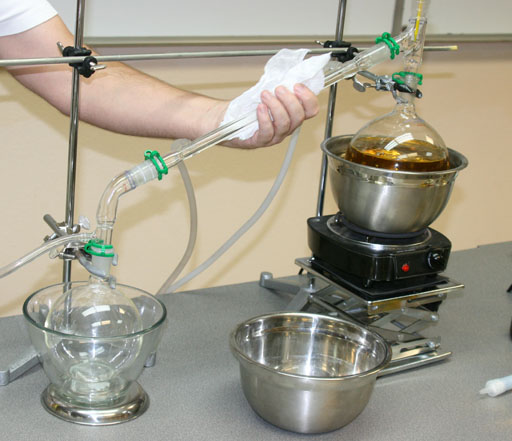
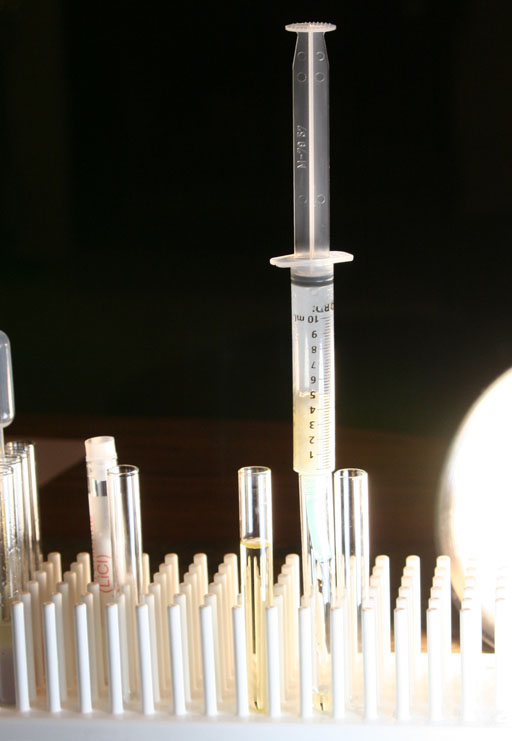
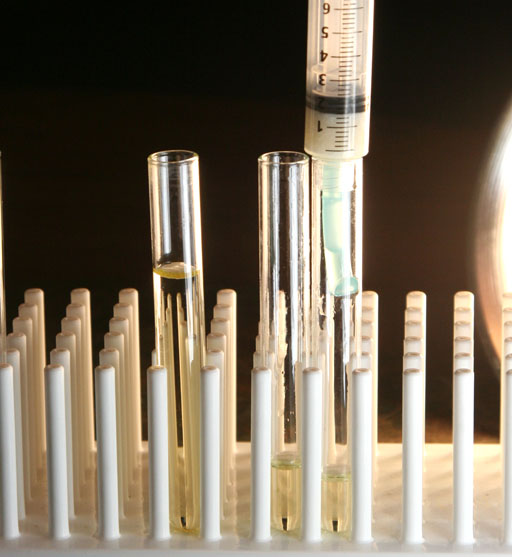
Syringe as a filter: Locate the syringe in your kit and pull out the plunger. Remember the blue rubber tubing that you used in the oxygen lab? Cut one inch off of the end of the tubing and place on the syringe. That will make the syringe more stable in the test tube. Place the pieces of paper towel into the syringe until they fill it to the 4 mL mark as shown in the image.
You can use a pipette to transfer the biodiesel to the syringe, or you can pour the biodiesel slowly into the syringe. If you decide to simply pour it, you might want to use a funnel on the syringe to keep it from spilling.
Notice the the washed biodiesel is cloudy because of the small droplets of water suspended in the biodiesel.
One end of the biodiesel molecule is slightly charged (red and blue regions), so water tends to adhere to that end as shown in the below image.
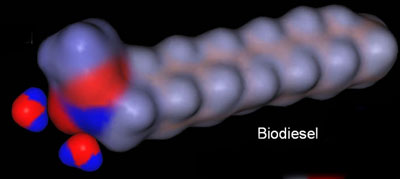
a6) What is the charge of the red regions and what element is responsible for that charge?
The biodiesel that passes through the filter should not look cloudy. It will be yellowish if it came from a vegetable oil, which this biodiesel did. However, it should be clear not cloudy if the water is being removed.
Our paper towel filter seems to be doing a good job in removing the water.
Take a photo of your syringe and paper filter as it is filtering the biodiesel.
After the first test tube fills up with biodiesel, move the syringe filter over to another test tube.
At this point we will insert the syringe plunger to expel the biodiesel that is soaked into the paper towels.
Once the syringe's plunger is in place, push down on the syringe to force out the biodiesel that is held by the paper towel.
When the biodiesel was deeper in the syringe, that extra weight of biodiesel helped push it through the paper towel. When the biodiesel gets down to the paper towel, there isn't much weight to push it through. So the plunger will provide the pressure to do that.
We first push the plunger down to the top of the pile of paper towel pieces. That biodiesel was collected in the middle test tube. We then moved to a third test tube to push the plunger down to squeeze the paper towels as far as it would go. We were concerned that squeezing the paper towels might release water, but that didn't happen. So you don't need the third test tube. So even upon squeezing, the water absorbed by the paper towels stayed attached to the paper towels.
If you had a lamp that used lamp oil, biodiesel is a good substitute. Biodiesel is also very good at cleaning oily items. I have even mixed it with gasoline and used it in a lawnmower. It seemed to work fine.
If you don't have any use for it, just put it back into the same large test tube that is labeled "Biodiesel and glycerin". The glycerin that you took out can be washed down the sink. Some cities actually use glycerin to help clean out the sewer pipes. Glycerin is half a glucose sugar, so it's like washing syrup down the drain.
You will need to use soap and water to wash the test tubes and beakers. The biodiesel leaves a film unless soap is used.
If you wish, you can copy the below summary into your email (or Word document) and type your answers after the descriptions. The required photos can either be attached to the email or inserted in the Word document if going that route. Try to keep each image under 2 megabytes. If the first letter of your last name is between A and G, send your lab reports to Loree Cantrell-Briggs at Loree.Cantrell-Briggs@phoenixcollege.edu If the first letter of your last name is between H and Z, send your lab reports to Quinn Thacker at QRT2004@yahoo.com. Be sure to title the email "Lab 10".
a. Lab 10 Experiment 1: Cleanup of Raw Biodiesel
Attach a photo of the two test tubes that had phenolphthalein added.
a1) Is pH 8.2 alkaline or acidic?
a2) The water sinks to the bottom. Which has the higher density, biodiesel or water?
a3) What color do you see in your third wash water?
a4) What color do you see in your fourth wash water?
Attach a photo of yourself shaking the large test tube with the biodiesel in it.
a5) What is silica gel?
a6) What is the charge of the red regions and what element is responsible for that charge?
Attach a photo of your syringe and paper filter as it is filtering the biodiesel.